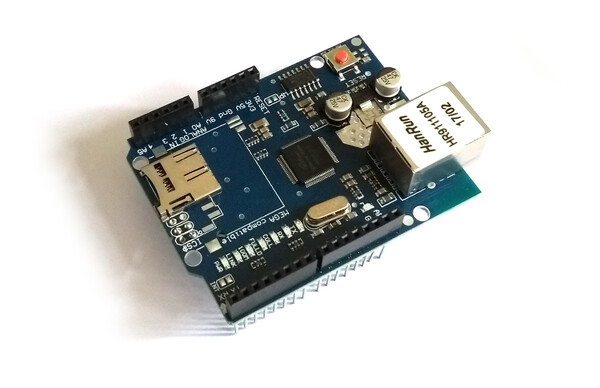
Arduino Ethernet and SD card shield (WIZnet W5100)
Standard Arduino Ethernet shields use the WIZnet W5100 chip, which provides
hardware support for TCP/IP. The W5100 is supported out by Pixl.js
when the espruino_2vxx_pixljs_wiznet.zip firmware is installed.
See here for more information.
Most other offical Espruino boards have firmware with support for the WIZnet W5500 and will not work with the W5100 without a special firmware build.
Wiring
The Ethernet shield shown above exposes the W5100 through pins on
the Arduino 2x3 pin ICSP header (which isn't present on Pixl.js)
rather than the standard Arduino footprint.
To connect it up, you will need to add 3 wires to the shield (mirroring the connections there would be on an Arduino UNO board), connecting:
- ICSP MOSI to
D11 - ICSP MISO to
D12 - ICSP SCK to
D13
 ---------------------------------
|              D13  D12  D11      |
|              SCK MISO  MOSI     |
|                                  \
| ETH                               |
| JACK                              |
|                                   |
|                        MISO ---   |
|                        SCK  MOSI  |
|                        ---- GND   |
|                                   |
|                         SD CARD   |
|                                   |
|                                   |
| RESET                            /
 ----------------------------------
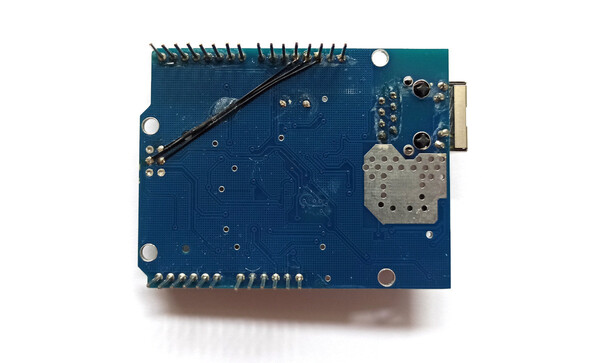
The easiest method is to remove the ICSP header completely and add wires on the underside of the board:
Pinout
This board has the following connections:
| Pin | Connection |
|---|---|
| D13 | SCK |
| D12 | MISO |
| D11 | MOSI |
| D10 | W5100 CS |
| D4 | SD Card CS |
| D2 | W5100 IRQ |
Software
As of Espruino 2v25, you'll need the espruino_2vxx_pixljs_wiznet.zip firmware installed.
See here for more information.
Ethernet
First, you need to set up communications with the WIZnet chip:
SPI1.setup({ mosi:D11, miso:D12, sck:D13 });
var eth = require("WIZnet").connect(SPI1, D10 /*CS*/);
Unlike the W5500 the W5100 doesn't come in a module with a pre-assigned MAC address set. You can either set one and then use DHCP to get an IP address:
eth.setIP({mac:"00:08:dc:ab:cd:ef"});
eth.setIP();
or can set the IP address manually:
eth.setIP({
  ip:"192.168.1.123",
  subnet:"255.255.255.0",
  gateway:"192.168.1.1",
  dns:"8.8.8.8",
  mac:"00:08:dc:ab:cd:ef"
});
Now you're ready to go - you can request a webpage:
require("http").get("http://www.pur3.co.uk/hello.txt", function(res) {
  res.on('data', function(d) {
    console.log("--->"+d);
  });
});
Note: there is currently an issue in the W5100 library that causes Espruino to pause for 30 seconds when closing a socket, however everything else works.
Or can even start a web server:
function pageHandler(req, res) {
  res.writeHead(200);
  res.end("Hello World");
}

require("http").createServer(pageHandler).listen(80);
console.log("Connect to http://"+eth.getIP().ip)
Functions that are available on eth are documented in the Ethernet Class
See the Internet page for more examples of things you can do on Espruino with an Internet connection.
SD Card
All you need to do to set up the SD card is:
// Setup SPI - no need to call this if you've already set up Ethernet
SPI1.setup({ mosi:D11, miso:D12, sck:D13 });
// Configure the SD card
E.connectSDCard(SPI1, D4 /*CS*/);
Then:
// see what's on the device
console.log(require("fs").readdirSync());
// write
require("fs")writeFileSync("test.txt","Some Data");
// read
print(require("fs").readFileSync("test.txt"));
See the page on File IO for more information.
Using

Buying
This page is auto-generated from GitHub. If you see any mistakes or have suggestions, please let us know.