Bangle.js First Application (Timer)
We'll assume you've already been through the Bangle.js Development page and have an idea how to get started.
If so you're now connected and can write some simple code - let's have a go at making a timer app.
To do this, it's best to use the right-hand side of the IDE - once uploaded you can tweak values and call functions using the REPL on the left if you want to.
Counting down
Copy the following code to the right of the IDE and click Upload  (first ensure the text under it says
 RAM - if not you can change it by clicking the down arrow next to it):
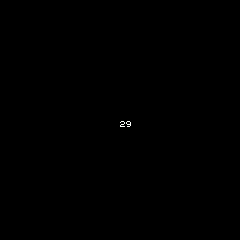
var counter = 30;

function countDown() {
  counter--;

  g.clear();
  // draw the current counter value
  g.drawString(counter, g.getWidth()/2, g.getHeight()/2);
  // optional - this keeps the watch LCD lit up
  Bangle.setLCDPower(1);
}

// call countDown every second
var interval = setInterval(countDown, 1000);
You'll now have some tiny text in the middle of the screen, which counts down from 29.
Why is the code formatted like this? Check out the Code Style page for some tips and the reasoning behind it.
Changing font
First, we'll want to make the text bigger, and properly centered. You have two options here - a bitmap font, or a vector one.
Because we're not resetting the state of the Graphics library with
reset() every frame, you can now just copy/paste the following
code onto the left-hand side of the IDE.
g.setFontAlign(0,0); // center font
g.setFont("6x8:8"); // bitmap font, 8x magnified
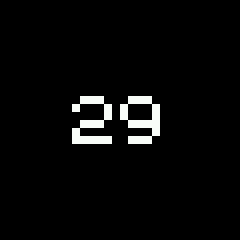
You'll now have a bigger (but pixellated) number in the center of the screen.
You can try different numbers (-1/1/0 for setFontAlign or changing 8 in
setFont) or can experiment with g.setColor("#00ff7f") to
change the colour.
When you have it as you want, add the code right after g.clear() on
the right hand side and re-upload to make it permanent.
If you'd prefer something smooth, you can use the Vector font, 80px high,
by replacing g.setFont("6x8:8") with g.setFont("Vector",80). You
can even include other fonts
or make your own

Note: Being able to change the font on the fly is handy in this case,
but in real apps other bits of JavaScript may run in the background (for example
for widgets) and may change the font, color, alignment/etc for themselves, which
would then affect your code. We recommend starting any function that draws with
g.reset() (which resets the state of the Graphics library to defaults) or
g.clear(1) which clears the screen and resets the state. This ensures that
no matter the state of Bangle.js when the function was called, it'll always draw
the same thing.
Messages and buzzing
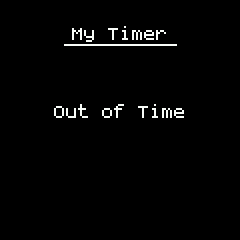
Finally, maybe we want to detect when the counter hits zero, display a message, and buzz:
var counter = 30;
var counterInterval;

function countDown() {
  counter--;
  // Out of time
  if (counter<=0) {
    // stop the timer
    clearInterval(counterInterval);
    counterInterval = undefined;
    // display the 'out of time' message
    E.showMessage("Out of Time","My Timer");
    // Now buzz
    Bangle.buzz();
    // again, every 5 seconds
    counterInterval = setInterval(() => Bangle.buzz(), 5000);
    return;
  }

  g.clear(1); // clear screen and reset graphics state
  g.setFontAlign(0,0); // center font
  g.setFont("Vector",80); // vector font, 80px
  // draw the current counter value
  g.drawString(counter, g.getWidth()/2, g.getHeight()/2);
  // optional - this keeps the watch LCD lit up
  Bangle.setLCDPower(1);
}

// call countDown every second
counterInterval = setInterval(countDown, 1000);
This will just keep on buzzing every 5 seconds until you reset the watch with a long-press of the button. Let's now make a press of the button clear the timer:
- Replace
counterInterval = setInterval(countDown, 1000);with:
function startTimer() {
  counter = 30;
  countDown();
  // if we had an interval before, clear it
  if (counterInterval)
    clearInterval(counterInterval);
  // call countDown every second
  counterInterval = setInterval(countDown, 1000);
}

startTimer();
As mentioned in the Bangle.js Development Tutorial you can use
setWatch to respond to the button at a low level, but then to be compatible with Bangle.js 1 and 2 (which
have different numbers of buttons) you need to choose the button with something like: (process.env.HWVERSION==2) ? BTN1 : BTN2
We're going to use Bangle.setUI which provides an abstraction
and makes this much easier.
- So finally we'll make a button press reset the timer. Add the following just after the
counterInterval = setInterval(() => Bangle.buzz(), 5000);line incountDown.
Bangle.setUI({
  mode : "custom",
  btn : ()=>{
    // remove old button press handler
    Bangle.setUI();
    // restart timer
    startTimer();
  }
});
Your code should now look like:
var counter = 30;
var counterInterval;

function countDown() {
  counter--;
  // Out of time
  if (counter<=0) {
    // stop the timer
    clearInterval(counterInterval);
    counterInterval = undefined;
    // display the 'out of time' message
    E.showMessage("Out of Time","My Timer");
    // Now buzz
    Bangle.buzz();
    // again, every 5 seconds
    counterInterval = setInterval(() => Bangle.buzz(), 5000);
    // Ensure a button press resets the timer
    Bangle.setUI({
      mode : "custom",
      btn : ()=>{
        // remove old button press handler
        Bangle.setUI();
        // restart timer
        startTimer();
      }
    });
    return;
  }

  g.clear(1); // clear screen and reset graphics state
  g.setFontAlign(0,0); // center font
  g.setFont("Vector",80); // vector font, 80px
  // draw the current counter value
  g.drawString(counter, g.getWidth()/2, g.getHeight()/2);
  // optional - this keeps the watch LCD lit up
  Bangle.setLCDPower(1);
}

function startTimer() {
  counter = 30;
  countDown();
  // if we had an interval before, clear it
  if (counterInterval)
    clearInterval(counterInterval);
  // call countDown every second
  counterInterval = setInterval(countDown, 1000);
}

startTimer();
Making an App
Now we have this, we need to turn it into an app for the watch. To do that we need two basic files on the watch:
- The app's code in a JS file
- A JSON
infofile describing the app (name/etc) for the launcher.
First, come up with a unique ID for your app. Don't use spaces, use lowercase letters, and try and make it reasonably short (under 10 characters is a good idea).
It shouldn't already be a folder in https://github.com/espruino/BangleApps/tree/master/apps so that it doesn't interfere with other apps you might install.
App Code: timer.app.js
We'll use timer. Now, click the down-arrow below the Upload button,
then choose Storage, then New File, and then type timer.app.js
and click Ok.
Now, click the Upload button. The app will be uploaded to the watch
and then executed from the file. With this set, you can easily
continue to develop your app as it is on the watch.
App Info: timer.app.info
Now we have the app, but it won't appear in the launcher on the watch because there is no app info file. To fix this, just copy and paste the following into the left-hand side of the IDE.
It'll write the relevant info to the file timer.info
require("Storage").write("timer.info",{
  "id":"timer",
  "name":"My Timer",
  "src":"timer.app.js"
});
If you now long-press the button on Bangle.js to get to the clock,
then press to get to the Launcher, you can scroll down and see My Timer.
If you select it, it'll execute your app!
Note: The Bangle App Loader
automatically generates the timer.info file for apps loaded
from it - we're just doing it here so you can create an app
without requiring the loader.
Icon: timer.img
In the menu, you'd have noticed that there was no icon shown.
To fix this, let's find a 48px icon. Unless you want to create one, we'd suggest using icons8.com as they're free for Open Source projects (we're also paid up just in case).
- Go to icons8.com
- Type
Timerinto the search box - On the left, click
Color- this is the style we often use in Bangle.js - Choose
Sand Timeror whatever you feel like - Click
Downloadand download the 48px image
Now it's time to convert the image for use in Espruino and upload it. You can use http://www.espruino.com/Image+Converter for this, but the tools are now built into the IDE.
- Click the
Storageicon above Upload:
- Choose
Upload a File - Select the image file you downloaded
- The IDE will detect it is an image and offer you some options for conversion
- Name the icon
timer.img - Ensure
Convert for EspruinoandTransparencyare checked - Choose
Optimal 2 bitand check the Preview. If the colours aren't good enough, tryOptimal 4 bitor8 bit Web Paletteinstead. - Now click
Okto upload
Now all you have to do is change the App Info file to reference the icon. Copy and paste this into the left-hand side of the IDE:
require("Storage").write("timer.info",{
  "id":"timer",
  "name":"My Timer",
  "src":"timer.app.js",
  "icon":"timer.img"
});
If you open the Launcher now, you'll see the icon!
Note: You can use these images in your app as well. If you want to
draw the timer image, just use g.drawImage(require("Storage").read("timer.img"),x,y)
Next Steps
Ok, so now we've got an app, and we can run it from the launcher.
How about adding it to the Bangle.js App Loader? Check out Adding an app to the Bangle.js App Loader
Or maybe you want to make a clock face
Bonus: adjusting the timer
Now we're using Bangle.setUI to handle the button press after the
timer expires, it's dead easy to add another call to it in startTimer
so that when the timer is working, we can use user interaction to adjust it.
All you need to do is add the Bangle.setUI code to startTimer as below:
function startTimer() {
  counter = 30;
  countDown();
  // if we had an interval before, clear it
  if (counterInterval)
    clearInterval(counterInterval);
  // call countDown every second
  counterInterval = setInterval(countDown, 1000);
  // allow interaction, drag up/down and press button
  Bangle.setUI({
    mode : "updown",
  }, dir => {
    if (!dir) { // if tapped or button pressed, start/stop
      if (counterInterval) {
        clearInterval(counterInterval);
        counterInterval = undefined;
      } else counterInterval = setInterval(countDown, 1000);
    } else { // otherwise if dir nonzero, count time up/down
      counter += dir + 1; // +1 because countDown decrements
      if (counter<3) counter=3;
      countDown();
    }
  });
}
Re-upload, and now (when the screen is unlocked) you can:
- drag up/down on Bangle.js 2 (or use upper/lower buttons on Bangle.js 1) to adjust the timer.
- tap the screen or press the button to start/stop the timer
This page is auto-generated from GitHub. If you see any mistakes or have suggestions, please let us know.