
Futaba S.Bus System
The S.Bus System is a way of controlling RC servo Motors more accurately using serial data. Normally servo motors use PWM - you can only have one servo motor per signal wire, and accuracy is usually around 1 in 200.
S.Bus servos accept an 11 bit signal (so theoretically are accurate to 1 in 2048) and you can normally have 16 servos per signal wire (each servo needs programming so that it knows what channel it is on).
The SBus (About Modules) module allows you to decode this signal in Espruino.
S.Bus uses a standard Serial protocol (even parity, 2 stop bits, 100000 baud), however the polarity is inverted so you must use an external inverter (a transistor, FET, or an optoisolator). The data format is:
- SBUS header (0x0F)
- 16 servos (11 bits each) packed together into 22 bytes.
- Final byte showing if failsafe activated, plus channels 17,18
- SBUS final byte (0x00)
Wiring Up
There are only three wires:
- Black (GND)
- Red (+5v)
- White (Signal)
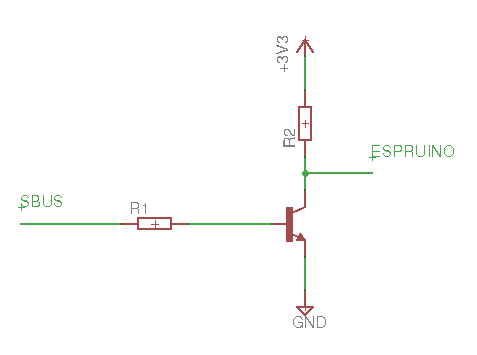
Unfortunately the signal wire can't be connected straight to Espruino as it needs inverting. To do this, connect a transistor and resistors as shown:
Software
Note: This module needs a firmware after Espruino 1v99 in order to be able to decode the SBus data.
When require("SBus").connect is called with a Serial device
and a pin to receive on, the following object is returned:
{
  channels : new Uint16Array(18), // 18 channels, ranging from 0..2047
  frameLoss : false,
  failSafe : false
}
Note: sbus.channels is a zero-based array. sbus.channels[0] is
actually SBus channel 1, and so on.
Each time a frame is received the data in sbus is updated and
a frame event is emitted. For instance to light each of the
3 LEDs depending on whether the channel is over halfway you could do:
var sbus = require("SBus").connect(Serial2, A3);
sbus.on('frame', function(sbus) {
  LED1.write(sbus.channels[0]>1023);
  LED2.write(sbus.channels[1]>1023);
  LED3.write(sbus.channels[2]>1023);
});
Or to control normal RC servo Motors from the SBus servo data:
var sbus = require("SBus").connect(Serial2, A3);
sbus.on('frame', function(sbus) {
digitalPulse(SERVO1, 1, 0.5+sbus.channels[0]/1024);
digitalPulse(SERVO2, 1, 0.5+sbus.channels[1]/1024);
// you could also use analogWrite to use the on-chip PWM hardware
// ...
});
This page is auto-generated from GitHub. If you see any mistakes or have suggestions, please let us know.