BLE Advertising with Node.js/Python/C#/Android
You can communicate with Puck.js via Bluetooth LE in three main ways:
- Connect to Puck.js from another device and send data down the Nordic UART service (or a custom one!) - most devices (PC, Mac, Linux, Android) can only connect to a maximum of 5 or 6 devices at a time.
- Have Puck.js connect to device and communicate with that device's services - most devices can only accept one concurrent connection.
- Have Puck.js advertise data that any device with in range - while only in one direction (from Puck.js to a listening device), you can have as many Pucks sending data as you want.
There's more information on what this all means here but we're going to focus on Advertising here.
For tips on using a Bluetooth connection see:
- Connecting from another Espruino Device
- Connecting from a Web Page with Web Bluetooth
- Connecting via Node.js or Python
You could use our Hub software to convert advertising data to MQTT where you can use Node-RED to work with it as well, but this tutorial will focus on writing your own host application.
First, we need to advertise some data. This can be done with the NRF.setAdvertising method.
There are two main types of advertising:
- Services - each Service has a Service UUID. These can be 16 bit or 128 bit. 16 bit UUIDs are assigned by the Bluetooth SIG so you need to use the right ones. You can use your own 128 bit UUIDs as long as they are random, however Bluetooth LE advertisements are so small that there isn't usually enough room for much data once you have used a 128 bit UUID. We could for instance use the Service UUID
0xFFFF(which shouldn't be used in production) with the commandNRF.setAdvertising({0xFFFF:"Hello"});. - Manufacturer Data Espruino/Puck.js firmware 1v95 and later allows Manufacturer Data to be specified. This is almost the same as using Services with 16 bit UUIDs, however Espruino/Puck.js has its own 16 bit UUID reserved (0x0590), which you can use for whatever use you want.
We're going to use Manufacturer Data here. Connect to Puck.js with the Web IDE and upload the following code:
var presses = 0;
NRF.setAdvertising({},{manufacturer: 0x0590, manufacturerData:[presses]});

setWatch(function() {
  presses++;
  NRF.setAdvertising({},{manufacturer: 0x0590, manufacturerData:[presses]});
}, BTN, {edge:"rising", repeat:1, debounce:20})
This will advertise a single byte, 0, which will increment each time the
button is pressed.
Now, you must disconnect the Web IDE from Puck.js. Puck.js only advertises data when no devices are connected to it.
Note: manufacturerData is an array of bytes (values between 0 and 255).
Larger values will be truncated. You can also specify a String, for instance
with NRF.setAdvertising({},{manufacturer: 0x0590, manufacturerData:"Hello"});.
Specifying too much data (more than 21 bytes) may result in a DATA_SIZE exception.
Puck.js/Espruino
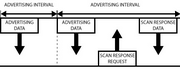
Pucks can listen to other advertisements using either NRF.setScan (for continuous listening) or
NRF.findDevices (to listen for a set time period and aggregate all responses). For instance
on another Puck you could run the following code:
NRF.findDevices(print)
and you'd get something like:
[
  BluetoothDevice {
    "id": "de:70:d9:0c:eb:86 random",
    "rssi": -44,
    "data": new Uint8Array([2, 1, 5, 4, 255, 144, 5, 11, 20, 9, 69, 115, 112, 114, 117, 105, 110, 111, 32, 78, 82, 70, 53, 50, 56, 51, 50, 68, 75]).buffer,
    "manufacturer": 1424,
    "manufacturerData": new Uint8Array([0]).buffer,
    "name": "Puck.js eb86"
   }
 ]
As well as any other devices within range. You can then check that manufacturer==0x0590
and can read the manufacturerData field to get the transmitted data.
Note: Scanning for advertising data uses a lot of power as Puck.js's radio has to stay on all the time - so if running off a battery you should do it as rarely as possible.
Chrome / Edge / Web Bluetooth
On Chrome based browsers, it is possible to scan for advertisements. You can either use navigator.bluetooth.requestLEScan to scan for all devices,
or device.watchAdvertisements() to scan for devices one by one.
However as of August 2023, this functionality only appears to be implemented enough to be useful on Chrome for Android, and it is only enabled behind a flag in chrome://flags.
Node.js
Node.js has a great module called Noble available that works on Windows, Mac OS and Linux.
- Mac OS Mojave currently has broken BLE support in noble so you may want to use the noble-mac library instead.
- Windows 10 users may want to use noble-uwp instead of noble to get out-of-the-box Bluetooth support.
Windows support requires a USB Bluetooth LE dongle that Windows doesn't have a Bluetooth driver installed for. This means you don't have to be using Windows 10, but if you do have Windows 10 and Bluetooth LE is working, you'll want to plug in an additional USB BLE dongle!.
Make sure Node.js is installed
- Then install
noblevianpm
# Install Noble to get Bluetooth LE support for Node.js
npm install noble
#  LINUX ONLY - Allow Node.js to access BLE even when it's not running as 'sudo'
sudo setcap cap_net_raw+eip $(eval readlink -f `which node`))
Now add the following code to advertising_nodejs.js:
var noble = require('noble');

function onDiscovery(peripheral) {
  // peripheral.rssi                             - signal strength
  // peripheral.address                          - MAC address
  // peripheral.advertisement.localName          - device's name
  // peripheral.advertisement.manufacturerData   - manufacturer-specific data
  // peripheral.advertisement.serviceData        - normal advertisement service data
  // ignore devices with no manufacturer data
  if (!peripheral.advertisement.manufacturerData) return;
  // output what we have
  console.log(
    peripheral.address,
    JSON.stringify(peripheral.advertisement.localName),
    JSON.stringify(peripheral.advertisement.manufacturerData)
  );
}

noble.on('stateChange',  function(state) {
  if (state!="poweredOn") return;
  console.log("Starting scan...");
  noble.startScanning([], true);
});
noble.on('discover', onDiscovery);
noble.on('scanStart', function() { console.log("Scanning started."); });
noble.on('scanStop', function() { console.log("Scanning stopped.");});
- And run it with
node advertising_nodejs.js
You should get something like the following:
Starting scan...
Scanning started.
de:70:d9:0c:eb:86 "Puck.js eb86" {"type":"Buffer","data":[144,5,0]}
de:70:d9:0c:eb:86 "Puck.js eb86" {"type":"Buffer","data":[144,5,0]}
de:70:d9:0c:eb:86 "Puck.js eb86" {"type":"Buffer","data":[144,5,0]}
de:70:d9:0c:eb:86 "Puck.js eb86" {"type":"Buffer","data":[144,5,0]}
de:70:d9:0c:eb:86 "Puck.js eb86" {"type":"Buffer","data":[144,5,1]}
de:70:d9:0c:eb:86 "Puck.js eb86" {"type":"Buffer","data":[144,5,1]}
de:70:d9:0c:eb:86 "Puck.js eb86" {"type":"Buffer","data":[144,5,2]}
de:70:d9:0c:eb:86 "Puck.js eb86" {"type":"Buffer","data":[144,5,2]}
de:70:d9:0c:eb:86 "Puck.js eb86" {"type":"Buffer","data":[144,5,3]}
de:70:d9:0c:eb:86 "Puck.js eb86" {"type":"Buffer","data":[144,5,4]}
de:70:d9:0c:eb:86 "Puck.js eb86" {"type":"Buffer","data":[144,5,5]}
de:70:d9:0c:eb:86 "Puck.js eb86" {"type":"Buffer","data":[144,5,5]}
de:70:d9:0c:eb:86 "Puck.js eb86" {"type":"Buffer","data":[144,5,5]}
You may get some other lines as well from other devices that have manufacturer data. You can see the third element of the buffer increments every time you press a button on Puck.js.
This could be improved:
- It'll report back any device with manufacturer data
- It always reports back advertising data, even if it hasn't changed.
So try the new code. Make sure you copy your Puck's address from
above into devices:
var noble = require('noble');

// List of allowed devices
const devices = [
  "de:70:d9:0c:eb:86"
];
// last advertising data received
var lastAdvertising = {
};

function onDeviceChanged(addr, data) {
  console.log("Device ",addr,"changed data",JSON.stringify(data));
}

function onDiscovery(peripheral) {
  // do we know this device?
  if (devices.indexOf(peripheral.address)<0) return;
  // does it have manufacturer data with Espruino/Puck.js's UUID
  if (!peripheral.advertisement.manufacturerData ||
      peripheral.advertisement.manufacturerData[0]!=0x90 ||
      peripheral.advertisement.manufacturerData[1]!=0x05) return;
  // get just our data
  var data = peripheral.advertisement.manufacturerData.slice(2);
  // check for changed services
  if (lastAdvertising[peripheral.address] != data.toString())
    onDeviceChanged(peripheral.address, data);
  lastAdvertising[peripheral.address] = data;
}

noble.on('stateChange',  function(state) {
  if (state!="poweredOn") return;
  console.log("Starting scan...");
  noble.startScanning([], true);
});
noble.on('discover', onDiscovery);
noble.on('scanStart', function() { console.log("Scanning started."); });
noble.on('scanStop', function() { console.log("Scanning stopped.");});
Starting scan...
Scanning started.
Device  de:70:d9:0c:eb:86 changed data {"type":"Buffer","data":[5]}
Device  de:70:d9:0c:eb:86 changed data {"type":"Buffer","data":[6]}
Device  de:70:d9:0c:eb:86 changed data {"type":"Buffer","data":[7]}
Device  de:70:d9:0c:eb:86 changed data {"type":"Buffer","data":[8]}
Device  de:70:d9:0c:eb:86 changed data {"type":"Buffer","data":[9]}
Device  de:70:d9:0c:eb:86 changed data {"type":"Buffer","data":[10]}
You can now write your own handler for onDeviceChanged to do whatever
is needed when something happens on Puck.js.
Python
Python has two main Bluetooth libraries you can use:
Bleak
bleak appears to be the most well supported Python
Bluetooth LE implementation at the moment.
All you need is python and pip (the package manager) installed
and you can run pip install bleak to get the latest version.
#!python3
# Scans for and outputs BLE advertising containing manufacturer data 0x0590
# needs: `pip install bleak`
import asyncio
import array
from bleak import BleakScanner
from bleak import BleakClient

async def main():
    stop_event = asyncio.Event()

    def callback(device, advertising_data):
        # print(advertising_data)  # debug
        if advertising_data.manufacturer_data and (0x0590 in advertising_data.manufacturer_data):
          d = advertising_data.manufacturer_data[0x0590]
          print("Found Espruino Manufacturer data", device)
          if advertising_data.local_name:
            print("  Name: ", advertising_data.local_name);
          print("  Data: ", ", ".join(hex(b) for b in d))
          # You could call stop_event.set() here if you found the device you want
          # and scanning will be stopped
        pass

    async with BleakScanner(callback) as scanner:
        await stop_event.wait()

# Start scanning
asyncio.run(main())
- Then run the Python file. Administrator priviledges are not needed:
python advertising_python.py
And you'll get something like the following:
Found Espruino Manufacturer data DD:7D:DE:06:87:2F: Puck.js 872f
  Name:  Puck.js 872f
  Data:  0x8
Found Espruino Manufacturer data DD:7D:DE:06:87:2F: Puck.js 872f
  Name:  Puck.js 872f
  Data:  0x8
...
Bluepy
You can also use the bluepy library
on Linux (including Raspberry Pi), but bluepy doesn't appear to support Windows
or Mac OS at the moment.
Just install it with pip install bluepy
Then we use the following code - the handling of advertising data
is basically the same as Node.js, except in this case the service
type (9005) is in the same value variable as the actual data.
- Add the following code to
advertising_python.py:
from bluepy.btle import Scanner, DefaultDelegate

def onDeviceChanged(addr, data):
  print("Device %s, value %s" % (addr,data))

# The devices we're searching for
devices = [
  "de:70:d9:0c:eb:86"
];
# Whatever the last data was
lastAdvertising = {}

# Gets the actual scanning data
class ScanDelegate(DefaultDelegate):
  def __init__(self):
    DefaultDelegate.__init__(self)
  def handleDiscovery(self, dev, isNewDev, isNewData):
    if not dev.addr in devices: return
    for (adtype, desc, value) in dev.getScanData():
      if adtype==255 and value[:4]=="9005": # Manufacturer Data
        data = value[4:]
        if not dev.addr in lastAdvertising or lastAdvertising[dev.addr] != data:
          onDeviceChanged(dev.addr, data)
        lastAdvertising[dev.addr] = data

# Start scanning
scanner = Scanner().withDelegate(ScanDelegate())
scanner.clear()
scanner.start()
# Keep scanning in  10 second chunks
while True: scanner.process(10)
# in case were wanted to finish, we should call 'stop'
scanner.stop()
- Then run the Python file. Python must be run with administrator priviledges to access the Bluetooth device:
sudo python advertising_python.py
And you'll get something like the following:
Device de:70:d9:0c:eb:86, value 35
Device de:70:d9:0c:eb:86, value 37
Device de:70:d9:0c:eb:86, value 39
Device de:70:d9:0c:eb:86, value 3a
Device de:70:d9:0c:eb:86, value 3b
Device de:70:d9:0c:eb:86, value 3c
Device de:70:d9:0c:eb:86, value 3d
Note that data in onDeviceChanged is a hexadecimal String. You'll want
to use int(data, 16) to convert it to an integer.
Windows UWP C#/JS/VB
The Node.js example above will work on Windows, however you may want to use another language. Bluetooth LE support only got added to the OS in Windows 10, so your application will be limited to Windows 10 and later.
Microsoft has some example code on watching for advertisements with the BluetoothLEAdvertisementWatcher class at https://docs.microsoft.com/en-us/windows/uwp/devices-sensors/ble-beacon.
There are also full example applications written in C#, JavaScript, and Visual Basic.
Android
Android has good documentation on Bluetooth LE, just check out the section titled Finding BLE Devices to see an example of scanning for Advertisements.
There's also an example application.
This page is auto-generated from GitHub. If you see any mistakes or have suggestions, please let us know.