DS18B20 Temperature Sensor
One of the most common 1-Wire devices is the DS18B20/DS18S20 thermometer, which can be read with the DS18B20 (About Modules) module.
Note: The DS18B20 comes in a cable, SMD, and transistor-style package. We're only covering the cable and transistor package here, but for the SMD one see the Datasheet.
Wiring
Connect as below, with a 4.7k resistor between data and the 3.3v line.
Newer Espruino firmwares use the microcontroller's internal pullup resistor so can function without the external resistor - however for any wire length over a few centimeters you'll still need an external resistor to get reliable communications.
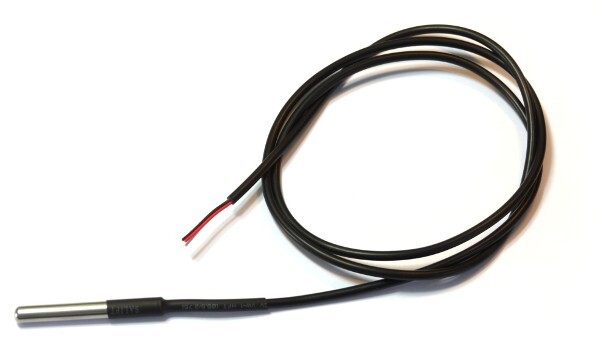
Cabled
There seem to be three types of cabled sensor (listed below - please tell us if you find more!). Note: there are two types of Green/Red/Yellow sensor so please check with the seller which one you have (type 2 is the most common).
| Sensor type 1 | Sensor type 2 | Sensor type 3 | Espruino | 4.7k Resistor |
|---|---|---|---|---|
| Black | Green | Yellow | GND | |
| Red | Red | Red | 3.3v | 1st wire |
| White/Blue/Yellow | Yellow | Green | Data - any GPIO | 2nd wire |
TO-92
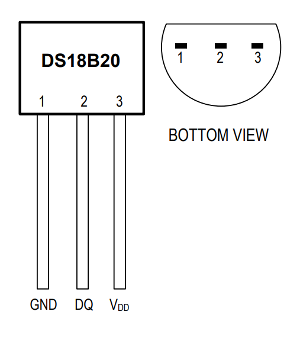
Just connect the TO-92 as in the pin diagram above (with the resistor mentioned above).
Software
To use it (assuming you connected to pin A1), simply write the following on the right-hand side:
var ow = new OneWire(A1);
var sensor = require("DS18B20").connect(ow);
setInterval(function() {
  sensor.getTemp(function (temp) {
    console.log("Temp is "+temp+"°C");
  });
}, 1000);
And the current temperature will be displayed every second.
27.625
You can also call the getTemp function directly (for instance console.log(sensor.getTemp())) however in this case it will immediately return with the last temperature reading and will start another. This means the first time getTemp is called, an incorrect temperature will be returned.
Multiple sensors
The DS18B20 communicates over a 1-Wire bus, which allows connecting multiple thermometers on the same data line.
To create an array containing three sensors, simply use:
var ow = new OneWire(A1);
var sensor1 = require("DS18B20").connect(ow, 0);
var sensor2 = require("DS18B20").connect(ow, 1);
var sensor3 = require("DS18B20").connect(ow, 2);
var sensors = [sensor1, sensor2, sensor3];
Alternatively, you can create the same array with a little help of the Array.map() function:
var sensors = ow.search().map(function (device) {
  return require("DS18B20").connect(ow, device);
});
Now make a function that will be called repeatedly by Espruino:
setInterval(function() {
  sensors.forEach(function (sensor, index) {
    sensor.getTemp(function (temp) {
      console.log(index + ": " + temp + "°C");
    });
  });
}, 1000);
And the current temperature of each sensor will be displayed every second:
0: 25.3125
1: 21.0625
2: 24.1875
Module reference
// For internal use - read the scratchpad region
DS18B20.prototype._r = function () { ... }

// For internal use - write to the scratchpad region
DS18B20.prototype._w = function (th, tl, conf) { ... }

/* Set the sensor resolution in bits. From 9 to 12.
    This setting is stored in device's EEPROM so it persists even after the sensor loses power.
*/
DS18B20.prototype.setRes = function (res) { ... }

// Return the resolution in bits. From 9 to 12
DS18B20.prototype.getRes = function () { ... }

// Return true if this device is still connected to the OneWire Bus
DS18B20.prototype.isPresent = function () { ... }

/* Get a temperature reading in degrees C. If callback is supplied,
it will be called with the current temperature. If it isn't the *last*
temperature will be returned and a new reading will be started. This
means that with no callback, the first call to getTemp will return
an invalid temperature. If the CRC fails, 'null' will be returned
*/
DS18B20.prototype.getTemp = function (callback) { ... }

// Return a list of all DS18B20 sensors with their alarms set
DS18B20.prototype.searchAlarm = function () { ... }

/* Set alarm low and high values in whole degrees C - see DS18B20.prototype.searchAlarm.
  If the temperature goes below `lo` or above `hi` the alarm will be set.
*/
DS18B20.prototype.setAlarm = function (lo, hi) { ... }

/* Initialise a DS18B20 device. Use either as:
  connect(new OneWire(pin)) - use the first found DS18B20 device
  connect(new OneWire(pin), N) - use the Nth DS18B20 device
  connect(new OneWire(pin), ID) - use the DS18B20 device with the given ID
*/
exports.connect = function (oneWire, device) { ... }
Using
 Heater Controller
 Wireless Temperature Sensor
 WiFi Enabled Thermometer
 Temperature Graph on a PCD8544 display, with DS18B20 temperature sensor
Temperature on a PCD8544 display, with DS18B20 temperature sensor
Temperature Graph on a PCD8544 display, with DS18B20 temperature sensor
Temperature on a PCD8544 display, with DS18B20 temperature sensor
Buying
DS18B20 modules can be purchased from many places:
This page is auto-generated from GitHub. If you see any mistakes or have suggestions, please let us know.