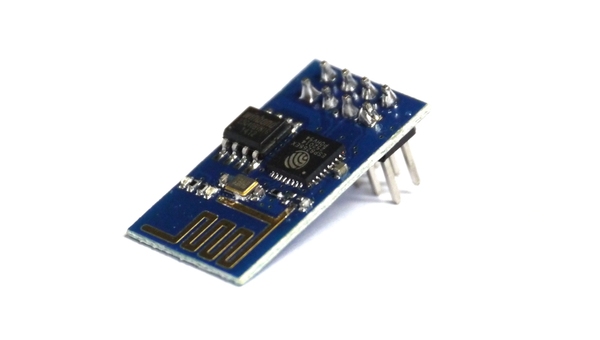
ESP8266 WiFi Module
Note: This page contains information on using an ESP8266 module with an Espruino board. If you want to run the Espruino Firmware directly on an ESP8266 board, see this page instead
Do you want a board that already has WiFi? Check out Espruino WiFi - it has an ESP8266, plus a separate processor for Espruino with loads of RAM and CPU power.
Support is provided in Espruino by the ESP8266WiFi (About Modules) and ESP8266WiFi_old (About Modules) modules.
Different versions of the ESP8266 firmware communicate at different baud rates and have subtly different commands - make sure you use the ESP8266 module that corresponds to the ESP8266 firmware version that you have.
Note: ESP8266 boards come with differing amounts of flash memory. Most now have at least 1MB, but if you have an ESP01 board with a blue PCB, that likely means it has only 512kB of flash memory.
Espruino Pico Shim
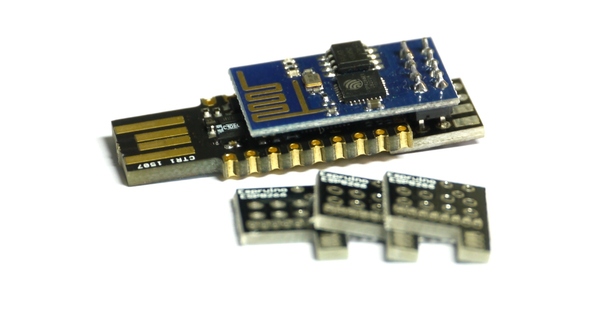
The Shim available for the Espruino Pico helps to adapt the ESP8266 to fit onto the Pico, while still keeping all of the IOs intact.
There are pads for an optional 3.3v regulator (not needed) and a 1206 or 1210-style capacitor. It's often a good idea to fit the capacitor if you're planning on powering anything else from the Pico's 3.3v rail. A 47uF, 6.3v 1210 MLCC capacitor like this one is perfect.
Please see the videos below for more information on wiring the shims up:
Shim Version 1
If you have the v1 shim and your Pico has pins pre-installed, you will need to cut the black plastic away from the last 3 pins in order to fit the shim.
Shim Version 2
Shim wiring:
| Pin | Pico Shim 1 | Pico Shim 2 | Notes |
|---|---|---|---|
| URXD | A2 | A2 | (Serial2) |
| VCC | 3.3 | 3.3 | |
| GPIO0 | N/C | A1 | Boot mode - must be 3.3v to enable WiFi, 0v for bootloader more. |
| RST | N/C | A10 | |
| GPIO2 | N/C | A0 | |
| CH_PD | 3.3 | B9 | CHip Power Down, 3.3v to enable WiFi, 0v for off. |
| GND | GND | GND | |
| UTXD | A3 | A3 | (Serial2) |
Wiring Up
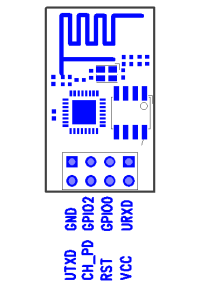
(viewed from component side)
| Pin | Espruino | Pico | Notes |
|---|---|---|---|
| URXD | C10 (Serial3 / Serial4) | A2 (Serial2) | |
| VCC | 3.3 | 3.3 | You'll need an extra 3.3v regulator when using this on an original Espruino board as it can't supply enough power. The Pico is fine without though. |
| GPIO0 | Not Connected | ||
| RST | Not Connected | ||
| GPIO2 | Not Connected | ||
| CH_PD | 3.3 | 3.3 | Boot mode - must be 1 to enable WiFi |
| GND | GND | GND | |
| UTXD | C11 (Serial3 / Serial4) | A3 (Serial2) |
Note:
If you're not using the ESP8266 shim, you will almost certainly need to add at least a 10uF capacitor between
GNDand the ESP8266's3.3vline to get it to work reliably.If you're using the Adafruit HUZZAH board, you'll only need power, GND, and RX/TX for it to work. As the board has its own voltage regulator, you'll need to run it off of 5V, not 3.3V.
The board communicates at 9600 8 baud, 1 stop bit, no parity. However some versions use 115200 baud - see below.
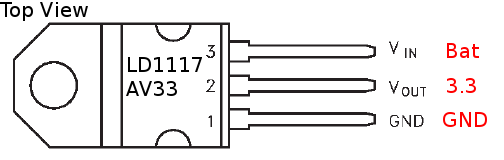
To add a voltage regulator (needed on the original Espruino board), we'd suggest you wire up an LD1117AV33 as follows:
If you're using the Shim for the Espruino Pico you needn't worry about this - just solder the Shim to the Espruino and the ESP8266.
Firmware Versions
To quickly test which firmware you have and that you have a connection, paste the following code into the left hand side of the Web IDE (making sure you use the pins and Serial port from the table above):
var serial = Serial2;
var pins = { rx: A3, tx : A2 };
function test(baud) {
  serial.removeAllListeners();
  var l="";
  serial.on('data', function(d) {l+=d;});
  serial.setup(baud, pins);
  serial.write("AT+GMR\r\n");
  setTimeout(function(){console.log(JSON.stringify(l));},800);
}
digitalWrite(B9,1); // enable on Pico Shim V2
setTimeout(function() { test(9600); }, 2000);
setTimeout(function() { test(115200); }, 3000);
setTimeout(function() { test(57600); }, 4000);
setTimeout(function() { console.log("Done!"); }, 5000);
After 6 seconds it should write Done!, but before that on one of the three quoted lines you should see something like "AT+GMR\r\r\n0018000902-AI03\r\n\r\nOK\r\n", showing that 0018000902-AI03 is the version number.
If you don't get any response, check that the red power LED on the ESP8266 is lit, and that you have TX and RX wires the correct way around.
| Tested Version | Baud Rate | Module Name | Notes |
|---|---|---|---|
0018000902-AI03 |
9600 | ESP8266WiFi_old |
This was the version sent on boards that came with the Espruino Pico KickStarter. It's quite old now, and is known have quite a few bugs. (download firmware) |
0.25.0.0 |
115200 | ESP8266WiFi |
This appears to be the one of the first stable AT firmwares (download firmware) |
0.40.0.0 |
115200 | ESP8266WiFi |
This comes pre-installed on the AI-thinker modules used for Espruino WiFi, and works well with Espruino |
1.1.0.0 |
115200 | ESP8266WiFi |
We've tested this firmware on Espruino WiFi and it works fine, however it is not compatible with 512kB ESP01 modules (download firmware) |
1.3.0.0 |
115200 | ESP8266WiFi |
This is a special 'noboot' version of SDK 2.0.0 that will work on even 512kB modules (download firmware) |
| latest | 115200 | ESP8266WiFi |
Espressif switched to GitHub releases for their new firmwares, however they are not all-in-one firmware files and no longer appear to work on 512kB ESP01 modules (download firmware) |
If you don't have the 0018000902-AI03 firmware version, make sure you change the baud rate and Module Name in the code examples below.
Note: ESP8266WiFi_0v25.js is still provided (as a copy of ESP8266WiFi.js) for compatibility with older code
Updating ESP8266 Firmware
While ESP8266 has the ability to automatically update its firmware over the air, the functionality in most early ESP8266 boards is broken - making updates a lot more difficult.
There are 3 main options:
Use the Espruino IDE
If you already have your ESP8266 attached to an Espruino board you may able
to use the Web IDE to update the firmware on the ESP8266. Click on Settings
then Flasher, and check under ESP8266 WiFi Firmware to see if your method
of wiring the ESP8266 is listed.
If it is, you can update the firmware directly. Note that if your board doesn't
have the BOOT pin wired, you will need to manually short the ESP8266 BOOT(GPIO0)
pin to GND while powering up the board to start the firmware update.
Use a separate USB-TTL adaptor
This is the easiest if your ESP8266 isn't soldered to your Espruino
- Get a USB-TTL converter
- Connect it to the ESP8266's RX and TX pins, and short GPIO2 to 3.3v when you first apply power to your ESP8266 (see the diagram under 'Wiring Up' to find which pins are which).
- Then, either use the esptool.py command-line tool like this:
./esptool.py write_flash 0 binary_file.bin - Or there is a tutorial using a Windows-based GUI on Instructables
Use Espruino
With newer Espruino firmwares (1v80) and later, you can flash the ESP8266 by using Espruino as a makeshift USB-TTL adaptor (this is easier on Linux/MacOS):
- Download esptool.py and get the correct firmware from the links in the table above.
- Change the following lines in
esptool.py:
# Maximum block size for RAM and Flash writes, respectively.
ESP_RAM_BLOCK   = 0x80
ESP_FLASH_BLOCK = 0x80
- Make sure you have an up to date Espruino firmware
- Connect to Espruino, copy and paste this code into the left-hand side, and click the disconnect button in the Web IDE (don't physically disconnect the board):
// On the Pico's new ESP8266 shim the following 4 lines automatically reboot into bootloader mode
digitalWrite(B9,1);
digitalWrite(A1,0);
digitalWrite(A10,0); // pulse reset
digitalWrite(A10,1);
// -------------------------
Serial2.setup(115200, { rx: A3, tx : A2 });
Serial2.on('data', function(d) { USB.write(d); });
USB.on('data', function(d) { Serial2.write(d); });
Serial1.setConsole();
- If you don't have the Pico's new ESP8266 shim, you'll need to boot the ESP8266 into bootloader mode manually. Take 2 wires and connect one side of each to GND. Connect the first to GPIO0, while connecting and releasing the second to RST (see the diagram under 'Wiring Up' to find which pins are which). See the video below:
- Finally run this command:
./esptool.py -p /dev/ttyACM0 -b 115200 write_flash 0 your_firmware.bin
The command above assumes you're running Linux. If you're using Windows or MacOS you'll have to change /dev/ttyACM0 to the name of the Serial port that Espruino is on. If everything works, it'll take a few minutes to update the ESP8266.
If not,
- If you're on Mac, you may need to install the
PySeriallibrary in order foresptool.pyto work correctly. - Check that the code under
Firmware Versionsworks - this'll make sure your power and serial lines are connected properly - When resetting into bootloader mode, the blue LED on the ESP8266 should flash briefly once. If it flashes twice then most likely GPIO0 wasn't shorted to GND when RST was released.
Software
Just use something like the following for the Espruino Pico:
var WIFI_NAME = "WiFi_Name";
var WIFI_PASS = "WPA2_Key";

digitalWrite(B9,1); // enable on Pico Shim V2
Serial2.setup(115200, { rx: A3, tx : A2 });
var wifi = require("ESP8266WiFi").connect(Serial2, function(err) {
  //                ^^^^^^^^^^^^^^^^
  //                Use ESP8266WiFi_old here (and 9600 baud) if you have an ESP8266 with firmware older than 0.25
  if (err) throw err;
  console.log("Connecting to WiFi");
  wifi.connect(WIFI_NAME, WIFI_PASS, function(err) {
    if (err) throw err;
    console.log("Connected");
    // Now you can do something, like an HTTP request
    require("http").get("http://www.pur3.co.uk/hello.txt", function(res) {
      console.log("Response: ",res);
      res.on('data', function(d) {
        console.log("--->"+d);
      });
    });
  });
});
or the following for the original Espruino board:
Serial4.setup(115200, { rx: C11, tx : C10 });
var wifi = require("ESP8266WiFi").connect(Serial4, function() {
  //                ^^^^^^^^^^^^^^^^
  //                Use ESP8266WiFi_old here (and 9600 baud) if you have an ESP8266 with firmware older than 0.25
 ...
}
Note: You don't absolutely have to call reset(), but in order to get a reliable connection we'd recommend it.
Apart from the initialisation (require("ESP8266WiFi").connect(...)) the networking code should be identical to that described on the Internet page.
Gotchas
Uncaught No 'ready' after AT+RST? Check you've got the correct firmware and baud rate, and that your wiring is correct.WARNING: Module "NetworkJS" not foundis because you either need to update the firmware on your Espruino board, or you're using a third-party board that doesn't have network support.- You can only have a maximum of 5 concurrent TCP/IP clients
- You can only have one TCP/IP server, and while it is active you can not have any clients
- You'll need to have the correct firmware on the ESP8266 (see above). See some of the links below for details on how to modify your firmware.
Reference
wifi.at
The AT command handler - use this to send your own AT commands to the ESP8266.
You can also call wifi.at.debug() to return debugging information and to turn
on debug messages.
wifi.debug()
Return information on open sockets and received data.
wifi.init(function(err) { ... })
Initialise WiFi settings - you shouldn't ever need to call this. The callback is called with err==null on success.
wifi.reset(function(err) { ... });
Reset the ESP8266 with AT+RST, also call wifi.init. This is called automatically from connect so is not needed in most cases. The callback is called with err==null on success.
wifi.getVersion(function(err, version) { ... });
Call the callback with the version number reported back from the AT+GMR command. The callback is called with err==null on success.
wifi.connect(ssid, key, function(err) { ... });
Connect to the given access point. The callback is called with err==null on success.
wifi.getAPs(function(err, aps) { ... });
Call the callback with a list of access points, of the form aps = [ { ssid, enc, signal_strength, mac_address } ]. The callback is called with err==null on success.
wifi.getConnectedAP(function(err, ap) { ... });
Call the callback with the name of the currently connected access point. The callback is called with err==null on success.
wifi.createAP(ssid, key, channel, enc, function(err) { ... })
Create an access point with the given ssid, key, channel, and encoding. Encoding can be 0, undefined, "open", "wep", "wpa_psk", "wpa2_psk" or "wpa_wpa2_psk".
See the table on Wikipedia for available channels. Channels 5 to 11 seem safe to use in virtually all countries. The function may fail if the supplied key is too short.
Example: wifi.createAP("ESP123","HelloWorld",5,"wpa2_psk",print)
wifi.getConnectedDevices(function(err, devices) { ... }); (0v25 firmware only)
If if AP mode (with wifi.createAP), call the callback with the second argument as an array of { ip, mac } objects - one for each connected device.
wifi.getIP(function(err, ip) { ... });
Call the callback with the current IP address, as a String. The callback is called with err==null on success.
Other Resources
- EspressIF ESP8266 Wifi
- http://wiki.iteadstudio.com/ESP8266_Serial_WIFI_Module
- http://www.electrodragon.com/w/Wi07c
- https://nurdspace.nl/ESP8266
- http://www.esp8266.com
- http://hackaday.com/2014/09/06/the-current-state-of-esp8266-development
- http://hackaday.io/project/2879-ESP8266-WiFi-Module-Library
Using
 Storing HTTPS Certificates
 Arduino ESP8266 WiFi Shield
 Espruino ISS Notifier
 IoT Services
 Handling POSTed data from Forms
 Pico Weather Station
 Interactive Web-based UI
 Logging to Google Sheets
Buying
This page is auto-generated from GitHub. If you see any mistakes or have suggestions, please let us know.