Pico LCD Display Hello World
Introduction
When writing code, most people test a piece of software by making it print Hello World!.
In Espruino, this is easy - you can connect with the Web IDE and type print("Hello World!"), however what if you want to display it without a computer connected.
Here, we'll wire up an LCD and will display Hello World on that.
You'll Need
- An Espruino Pico
- A Nokia 5110 LCD
- Breadboard
Wiring Up
Wiring this up is really simple, because the LCD draws so little power that we can power it from Espruino's GPIO lines...
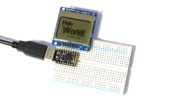
- Put the Espruino Pico on the breadboard with the USB connector facing left
- Put the LCD directly above it, aligned to the right (so the pin on the Pico nearest the USB connector should not be connected to anything)
See the picture above for an example.
Software
We're going to start off using the code from the Nokia 5110 LCD page, but with a few small tweaks:
- We're going to manually set up the pins for the LCD's power
- As the Pico's hardware SPI pins don't align with the LCD, we'll just use Software SPI instead (which will work on any pins).
A5.write(0); // GND
A7.write(1); // VCC

// Setup SPI
var spi = new SPI();
spi.setup({ sck:B1, mosi:B10 });
// Initialise the LCD
var g = require("PCD8544").connect(spi,B13,B14,B15, function() {
  // When it's initialised, clear it and write some text
  g.clear();
  g.drawString("Hello World!",0,0);
  // send the graphics to the display
  g.flip();
});
Copy and paste this code into the right-hand side of the Web IDE and click the Send to Espruino button. The display should now show Hello World!.
But we're not quite done. What if we wanted it to work without a computer? The LCD itself needs initialising each time the power turns on.
We'd have to write our code in the special onInit function that is called when Espruino starts up:
A5.write(0); // GND
A7.write(1); // VCC
A6.write(1); // Turn on the backlight

var g; // Define g globally, so that it can be used by other functions

function onInit() {
  // Setup SPI
  var spi = new SPI();
  spi.setup({ sck:B1, mosi:B10 });
  // Initialise the LCD
  g = require("PCD8544").connect(spi,B13,B14,B15, function() {
    // When it's initialised, clear it and write some text
    g.clear();
    g.drawString("Hello World!",0,0);
    // send the graphics to the display
    g.flip();
  });
}
Note: If you send this over in the same way as the last code, nothing will happen - because onInit() hasn't been run.
You can run onInit() manually by typing onInit() on the left hand side or adding it to the end of the right hand side before sending code over. However this time, just type save(). Your code will be saved to flash, reloaded, and the LCD will display Hello World! again.
Try unplugging the board from USB and re-plugging it - it'll still display Hello World!.
Improving it...
What we've displayed is a bit boring though - what if you wanted to display the text at slightly different sizes?
Espruino has a Vector font built in, which can be accessed using g.setFontVector(size). You can switch back to the original (small) font with g.setFontBitmap() too.
A5.write(0); // GND
A7.write(1); // VCC

var g;

function onInit() {
  // Setup SPI
  var spi = new SPI();
  spi.setup({ sck:B1, mosi:B10 });
  // Initialise the LCD
  g = require("PCD8544").connect(spi,B13,B14,B15, function() {
    // When it's initialised, clear it and write some text
    g.clear();
    // draw in a vector font at location x:0, y:0
    g.setFontVector(12);
    g.drawString("Hello",0,0);
    // draw in a slightly bigger vector font at location x:10, y:16
    g.setFontVector(20);
    g.drawString("World!",10,16);
    // switch back to the small font again
    g.setFontBitmap();
    g.drawString("a tiny font",25,40);
    // send the graphics to the display
    g.flip();
  });
}
Finally, we might want to animate the text. We can do this using setInterval to repeatedly call the code that updates the screen:
A5.write(0); // GND
A7.write(1); // VCC

var g;
var pos = 0;

function draw() {
  g.clear();
  // draw in a vector font
  g.setFontVector(12);
  g.drawString("Hello",0,0);
  // draw in a font that changes size over time
  pos += 0.5;
  g.setFontVector(18 + Math.sin(pos)*4);
  // here we centre the text by finding out how long
  // it is with g.stringWidth first
  g.drawString("World!",42-g.stringWidth("World!")/2,16);
  // switch back to the small font again
  g.setFontBitmap();
  g.drawString("a tiny font",25,40);
  // send the graphics to the display
  g.flip();
}

function onInit() {
  // Setup SPI
  var spi = new SPI();
  spi.setup({ sck:B1, mosi:B10 });
  // Initialise the LCD
  g = require("PCD8544").connect(spi,B13,B14,B15, function() {
    // When it's initialised, set up an animation at 20fps (50ms per frame)
    setInterval(draw, 50);
  });
}
This page is auto-generated from GitHub. If you see any mistakes or have suggestions, please let us know.