Pico Weather Station
Introduction
We'll connect the Pico up to an LCD and WiFi module, and use it to grab the current english weather off of the BBC Weather website's RSS feed and then display it on the screen.
This is basically the code from the Pico LCD Hello World tutorial plus the code on the ESP8266 page, with one extra function parseWeather which grabs the weather data out of the website's response and puts in on the LCD.

You'll Need
- An Espruino Pico
- A Nokia 5110 LCD
- An ESP8266 WiFi module
- Breadboard (unless soldering)
Wiring Up
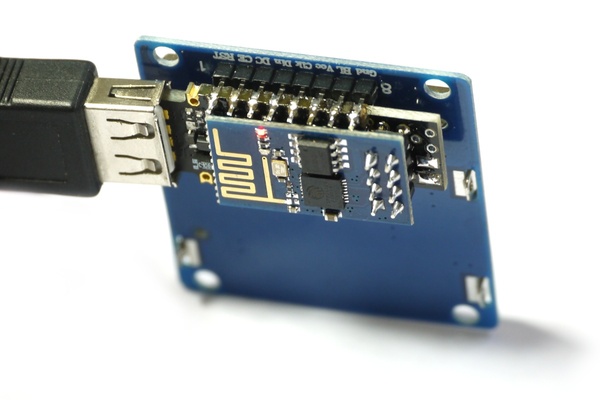
To connect the ESP8266 module up, see the ESP8266 page for instructions. 4 wires are needed, or you can use the adaptor shim
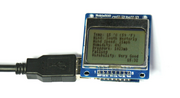
The LCD draws so little power that we can power it from Espruino's GPIO lines... Follow the instructions on the Pico LCD Hello World tutorial if using breadboard, but if you're soldering you can make exactly the same connections by soldering the LCD straight to the Pico as shown in the picture above.
Software
When you place a query to the BBC Weather RSS feed, you get a result like this:
<?xml version="1.0" encoding="UTF-8"?>
<rss xmlns:atom="http://www.w3.org/2005/Atom" xmlns:georss="http://www.georss.org/georss" version="2.0">
  <channel>
    <atom:link href="http://open.live.bbc.co.uk/weather/feeds/en/2647937/observations.rss" rel="self" type="application/rss+xml" />
    <title>BBC Weather - Observations for  Greenwich, United Kingdom</title>
    <link>http://www.bbc.co.uk/weather/2647937</link>
    <description>Latest observations for Greenwich from BBC Weather, including weather, temperature and wind information</description>
    <language>en</language>
    <copyright>Copyright: (C) British Broadcasting Corporation, see http://www.bbc.co.uk/terms/additional_rss.shtml for more details</copyright>
    <pubDate>Sun, 12 Apr 2015 15:37:05 +0100</pubDate>
    <item>
      <title>Sunday - 15:00 BST: Sunny, 17°C (63°F)</title>
      <link>http://www.bbc.co.uk/weather/2647937</link>
      <description>Temperature: 17°C (63°F), Wind Direction: South Westerly, Wind Speed: 19mph, Humidity: 40%, Pressure: 1024mb, Falling, Visibility: Excellent</description>
      <pubDate>Sun, 12 Apr 2015 15:37:05 +0100</pubDate>
      <guid isPermaLink="false">http://www.bbc.co.uk/weather/2647937-2015-04-12T15:37:05.000+01:00</guid>
      <georss:point>51.47785 -0.01176</georss:point>
    </item>
  </channel>
</rss>
Note: To get the weather for a different area, go to the BBC weather page for the place you're interested in, then click on the orange 'RSS' logo choose 'Observations' and copy the link.
As Espruino doesn't have an XML parser built-in, we're going to stick the XML in a string, and search for the first <description> tag that comes after the first <item> tag.
The code for this is below - see the documentation in line. Simple copy this and paste it into the right hand side of the Web IDE (changing the WiFi credentials up the top). Click Send to Espruino and it should display Please Wait on the LCD and start connecting to the WiFi network.
var WLAN_NAME = "...";
var WLAN_KEY = "...";
var WEATHER_URL = "http://open.live.bbc.co.uk/weather/feeds/en/2647937/observations.rss";

var wifi;
var g;

A5.write(0); // LCD GND
A7.write(1); // LCD VCC

// This gets the weather out of the XML and writes it to the LCD
function parseWeather(xml, date) {
  // No XML parser, so we have to be nasty
  var item = xml.indexOf("<item>");
  var descStart = xml.indexOf("<description>", item);
  var descEnd= xml.indexOf("</description>", descStart);
  var desc = xml.substring(descStart+13,descEnd);
  // replace the degrees symbol with a quote - built in font only does first 128 chars
  desc = desc.replace("°","'").replace("°","'");
  // make sure things fit on the tiny screen!
  desc = desc.replace("Wind Direction","Wind").replace("Temperature:","Temp:");
  // draw one item per line
  var weather = desc.split(", ");
  g.clear();
  weather.forEach(function(s,i) {
    g.drawString(s,0,i*6);
  });
  // Finally print the time from the HTTP request (so we know it's up to date!)
  var d = new Date(date);
  var timeStr = d.getHours()+":"+("0"+d.getMinutes()).substr(-2);
  g.drawString(timeStr, g.getWidth()-g.stringWidth(timeStr), g.getHeight()-5);
  // Now send this to the LCD
  g.flip();
}

// Actually get weather off the net and display it
function getWeather() {
  // do an HTTP request
  require("http").get(WEATHER_URL, function(res) {
    // console.log("Response: ",res);

    // read the whole response into a variable
    // note: this works here but isn't a great idea - big responses can
    // easily use up all the available memory
    var xml = "";
    res.on('data', function(d) { xml += d; });
    // when the connection closes, parse the weather and write to the LCD
    res.on('close', function(d) { parseWeather(xml, res.headers.Date); });
  });
}

// When we start up...
function onInit() {
  // if we save()d to flash after we'd already run onInit() we need to clear existing intervals
  clearInterval();
  // Set up the ESP8266
  Serial2.setup(9600, { rx: A3, tx : A2 });
  console.log("Init ESP8266...");
  wifi = require("ESP8266WiFi").connect(Serial2, function(err) {
    if (err) throw err;
    console.log("Connecting to WiFi");
    wifi.connect(WLAN_NAME, WLAN_KEY, function(err) {
      if (err) throw err;
      console.log("Connected");
      // Now start getting weather...
      setInterval(getWeather, 60000); // every 60s
      getWeather(); // do the first one right away
    });
  });
  // Setup SPI for LCD
  var spi = new SPI();
  spi.setup({ sck:B1, mosi:B10 });
  // Initialise the LCD
  g = require("PCD8544").connect(spi,B13,B14,B15, function() {
    g.drawString("Please wait...",0,0);
    g.flip();
  });
}

onInit();
This page is auto-generated from GitHub. If you see any mistakes or have suggestions, please let us know.