
Bangle.js and Edge Impulse for Machine Learning

INTRODUCTION
In this tutorial you will learn how to get started with Machine Learning on your Bangle.js watch. Specifically you will build and train a model learning to recognize different movements of your watch hand. The steps include how to collect data, how to use Edge Impulse for the machine learning part and how to finally upload the learned model back to the watch and utilise it there.
Prerequisites
Hardware
- Bangle JS, version 1, or version 2
- Theoretically the Bangle Emulator might work as well, but you can’t of course collect real accelerometer or heart rate data with an emulator!
- Computer with Bluetooth (BLE)
- Get the watch up and running by following these guidelines … and connected by these guidelines
Software
- Create an Edge Impulse account for free here
- Python
- used to split a file with samples into separate .CSV-files for importing into Edge Impulse
- not strictly necessary, but very useful if you want to collect lots of samples
- for information about how to install or use Python, check e.g. Python documentation
- Notepad, Notepad++, Excel etc. can also be used to manually split files, not feasible with lots of samples
Preparation
- Install the app
Gesture Teston your watch from the Bangle App Loader
Collect gesture samples
This part will guide you how to use your watch to collect multiple samples for one gesture type at a time.
- Pair your computer with the watch using Espruino Web IDE
- Paste the below Gesture collection code into the right side in Espruino Web IDE (adapted from this code)
- the code will create a text file in the watch memory
- Name the event you are going to collect samples for by changing the line
event="left";- use e.g.
event="left";for twitching your watch hand left and later onevent="right";for the opposite direction - upload the code to RAM. Do not upload this code to flash or storage, you might in worst case need to reset the watch completely.
- use e.g.
- Perform the gesture
- repeat the gesture many times, the more the merrier!
- wait a second between each
- the gesture collecting code will append each sample to the .CSV-file
- a graph will also be shown on your watch screen
- repeat the gesture many times, the more the merrier!
- Repeat steps 3-4 above, remember to change
event="<gesture>";where<gesture>is the hand movement you will collect - The devil is in the details, do not e.g. remove the seemingly insignificant semi-colon
;!
Gesture collecting code:
// ******* Gesture collecting code ********
name="Gesture";
event="left";

var fname = 1;

function gotGesture(d) {
  var f = require("Storage").open(event + "." + fname + ".csv", "a");

  print("timestamp, x, y, z");
  f.write("timestamp, x, y, z\n");
  for (var j=0;j<d.length;j+=3) {
       print(j +", ", d[j] + ", " + d[j+1] + ", " + d[j+2] );
       f.write(j + ", " + d[j] + ", " + d[j+1] + ", " + d[j+2] +"\n" );
  }

  g.clear();
  g.setColor(1,1,1);
  var my = g.getHeight()/2;
  var sy = my/128;
  var sx = g.getWidth()/(50*3);
  g.drawLine(0,my,g.getWidth(),my);
  for (var i=0;i<d.length-3;i+=3) {
    for (var c=0;c<3;c++) {
      g.setColor(c==0,c==1,c==2);
      g.drawLine(i*sx, my+d[i+c]*sy, (i+3)*sx, my+d[i+c+3]*sy);
    }
  }
  g.flip(1);
}

Bangle.on('gesture',gotGesture);
Transfer .CSV-files from Bangle.js to your computer
This part will guide you how to transfer the .CSV-files from your watch to your computer.
- In Espruino Web IDE, click the Storage icon (4 discs) in the middle of the screen
- Search for your file/files, they start with the event name you provided in earlier steps e.g.
left.1.csv (StorageFile) - Click on
Save(the floppy disc icon) for one file at a time and save the files to a folder of your choice, e.g. toc:\temp
Split .CSV-files using Python
This part will guide you how to split the .CSV-files you've downloaded from your watch into separate .CSV-files. The reason for this is that Edge Impulse requires one .CSV-file per sample.
- Copy the below Python code (shamelessly copied from Stackoverflow) into your favourite Python editor.
- Replace the path on the second line (starting with
PATENTS = ...) with the full path and filename for the first file you want to split. I.e. the file you downloaded in previous steps. - Run the code in your Python editor
- The program will search for the string
'timestamp, x, y, z'in the original file and for each time (= sample) it finds, create a new file. - If you don't use Python, you'd need to split the file for each sample using some other method, manual or automatic. Remember that the samples aren't all of the same size so the amount of rows will vary.
- You should now have several .CSV-files in the folder you chose. The files will be named like
left.1.csv (StorageFile)-15.csvwhere-15at the end is a running number.
- The program will search for the string
- Repeat steps 2-3 above for each file you downloaded from your watch.
import re
PATENTS = 'C:/temp/left.1.csv (StorageFile)'

def split_file(filename):
    # Open file to read
    with open(filename, "r") as r:

        # Counter
        n=0

        # Start reading file line by line
        for i, line in enumerate(r):

            # If line match with template -- <?xml --increase counter n
            if re.match(r'timestamp, x, y, z', line):
                n+=1

                # This "if" can be deleted, without it will start naming from 1
                # or you can keep it. It depends where is "re" will find at
                # first time the template. In my case it was first line
                if i == 0:
                    n = 0

            # Write lines to file
            with open("{}-{}.csv".format(PATENTS, n), "a") as f:
                f.write(line)

split_file(PATENTS)
Use Edge Impulse for machine learning
In this part you will learn how to upload the sample files you've created earlier, create a machine learning model, train and finally analyse it. This tutorial will only cover the essential steps needed for Bangle.js. To learn more about Edge Impulse, see e.g. getting started and continuous motion recognition.
Log in and create a project
- Log in to Edge Impulse, using the credentials for the free account you created in the beginning.
- Create a new project and give it a name, why not Bangle.js
- Select
Accelerometer datawhen asked for the type of data you are dealing with. - Click
Let's get started
Upload sample data
- Select
Data acquisitionfrom the left hand menu - Click on the icon labeled
Upload existing data - Click on
Choose files- Navigate to the folder you used to store the .CSV-files (e.g. c:\temp)
- Select all the sample files that were created earlier, but not the original files you downloaded from your watch. I.e. select only the .CSV-files with a number at the end of the file name, e.g.
left.1.csv (StorageFile)-0.csv. - You can also upload smaller batches at a time
Automatically split between training and testingandInfer from filenameshould both be selected
- Click
Begin upload- this will now quickly upload the files to your project.- The upload process is shown on the right side, if everything goes well, you should at the end see a message like this:
Done. Files uploaded successful: 85. Files that failed to upload: 0.
Job completed
- The upload process is shown on the right side, if everything goes well, you should at the end see a message like this:
- Take a look at a sample by selecting any row
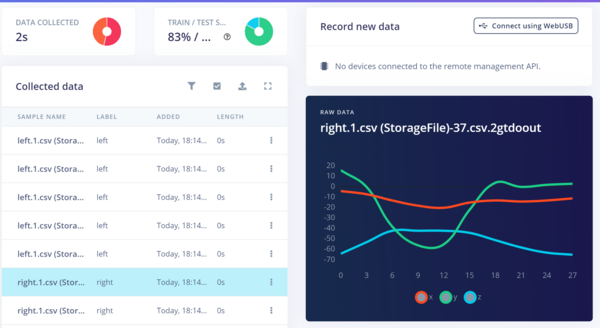
- Notice that the labels (
leftandrightin this example) were automatically inferred from the filenames you used. - Always strive to get a roughly similar amount of samples for each gesture. You can see the balance in the pie graph on the left.
- Also notice that Edge Impulse split the sample files so that approximately 80 % will be used for training and 20 % for testing purposes.
- Through the four small icons you can filter your data, select multiple items, upload more data or see a slightly more detailed list view. With the help of these you can e.g. mass delete many files at a time.
Create an impulse
An impulse takes raw data, uses signal processing to extract features, and then uses a learning block to classify new data. These steps will create an impulse.
- Click
Create impulse - Change the window size and increase according to the screenshot below.
- Add the
Raw Dataprocessing block - Add the
Classification (Keras)learning block - Click
Save Impulse
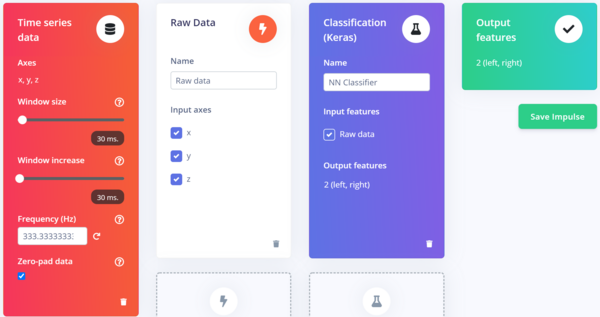
- Note that you often need to tweak one or several of the settings, this is depending on what you want to achieve and the quality & quantity of your data.
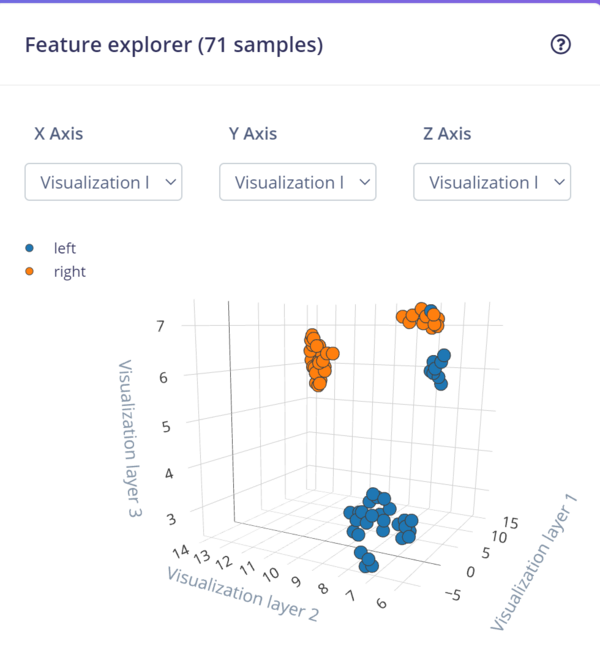
Generate features
- Click
Raw datafrom the left hand menu- You will see a graph of one of the samples as well as the raw features.
- In this case you don't need to change anything, so click
Save parameterswhich will take you to the second tab. - Click
Generate features- This processes the samples
- After a while you will see a graph in the
Feature explorer. This gives you a 3D view of how well your data can be clustered into different groups. In an ideal situation all similar samples should be clustered into same group with a clear distinction between groups. If that's not the case, no worries at this point, the neural network algorithm will in many cases still be able to do a very good job!
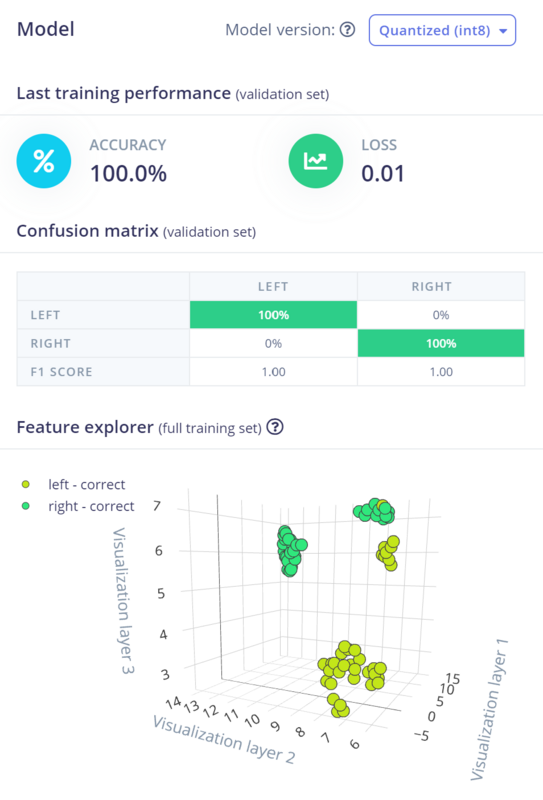
Train the neural network
Here you will train the neural network and analyse its performance.
- Click
NN Classifierfrom the left hand menu - Change the
Number of training cyclesto 100. This is another parameter to tweak, the higher this number is, the longer time the training will take, but also the better the network will perform, at least until it can't improve anymore. - Click on
Start training - Within a few minutes, depending on the number of labels and data quantity you have, the training will finish.
- The graph shows the training performance and accuracy. While 100 % looks like a perfect score, it isn't necessary so. The reason is that the network might perform poorly in real situations when confronted with sample data not seen before.
Download the trained model
Here you will download the trained model to your computer.
- Click
Dashboardfrom the left hand menu - Scroll down to the section
Download block outputand click on the icon next toNN Classifier model TensorFlow Lite (int8 quantized)- The float32 model might sometimes perform slightly better than the int8 model, but it requires more memory and might cause Bangle.js to crash because of this.
- Save the file to a folder of your choice
DEPLOYMENT
Transfer the trained model to Bangle.js from your computer
This part will guide you how to transfer the model file from your computer to Bangle.js.
- In Espruino Web IDE, click the Storage icon (4 discs) in the middle of the screen
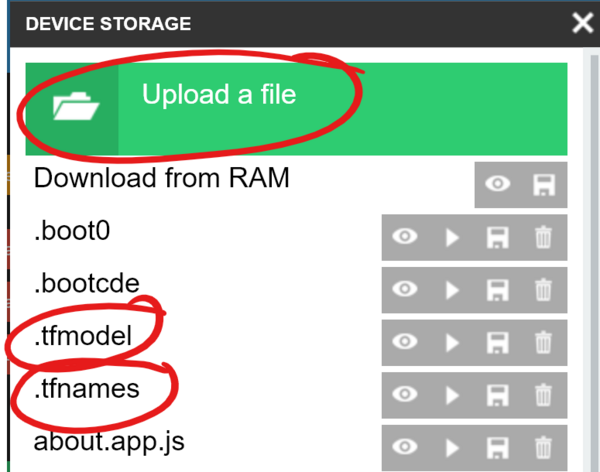
- Click
Upload a file - Select the model file you downloaded from Edge Impulse
- Change the filename to
.tfmodeland clickOk - Create a text file, e.g. with Notepad
- Write the event names in alphabetical order, separated by commas, e.g.
left,right - Save the file to a folder of your choice
- Write the event names in alphabetical order, separated by commas, e.g.
- In Espruino Web IDE, click the Storage icon (4 discs) in the middle of the screen
- Select the file you just created
- Change the filename to
.tfnamesand clickOk
Test the gestures on Bangle.js!
Finally you will be able to test how well the trained model performs in real life! Just a few steps left.
- Paste the below code into the right side in Espruino Web IDE
- Upload the code to RAM
- This short program will trigger your watch to sense movements and try to recognise which movement it was.
- The recognised movement, e.g.
leftorright, will be shown in the left window in Espruino Web IDE as well as on your watch display.
Bangle.on('aiGesture',(gesture,raw)=>print(gesture,raw));

Bangle.on('aiGesture',(gesture)=>{
  E.showMessage(gesture);
  setTimeout(()=>g.clear(), 1000);
});
FINAL COMMENTS
First of all, hopefully you with this short tutorial were successful in training and recognising gesture events from your Bangle.js. Hopefully it also inspires you to try to improve the performance, e.g. by collecting more samples, by collecting more event types or by tweaking the different parameters and settings in Edge Impulse.
This page is auto-generated from GitHub. If you see any mistakes or have suggestions, please let us know.