Bangle.js Layout library
You might have tried making an app (eg by following the Bangle.js First App tutorial), but as your app gets more complicated it can be more of a pain laying things out on the screen - especially if you want to write an app that works on both Bangle.js 1 and Bangle.js 2 which both have different screen sizes and numbers of buttons.
Rather than requiring lots of fiddling and separate positions for each device, you can use the Layout library to automatically place everything on the screen.
Simple Layout
By default, Layout centers everything on the screen. Try pasting in this code - a basic 'Hello world':
var Layout = require("Layout");
var layout = new Layout( {
  type:"txt", font:"6x8", label:"Hello World"
});
g.clear();
layout.render();
If you upload, you'll see Hello World in the middle of the screen:

Let's say we want to make a simple clock - so the time, followed by a line for the date. We need vertical alignment, so we'll start with a block of type v, containing an array of children in c:
var Layout = require("Layout");
var layout = new Layout( {
  type:"v", c: [
    {type:"txt", font:"20%", label:"12:00", id:"time" },
    {type:"txt", font:"6x8", label:"The Date", id:"date" }
  ]
});
g.clear();
layout.render();

The font can be specified with a percentage, in which case it's made into a Vector font with that percentage of screen height.
We also specified an id, which makes the item available directly from layout, eg layout.time. To update the time, we can then change layout.time.label and redraw.
Alignment
You can align elements within their h or v containers with halign and valign, however within an element, text is always rendered centered.
As a result, if you want to align text, you shouldn't use fillx:1 in the text element as the element will then fill to all available space and won't align.
var layout = new Layout( {
    type:"v", c: [{
        type:"txt",
        font:"20%",
        fillx:0, // must be 0 for halign to work
        filly:1,
        halign:-1, // LEFT align
        label:"Left"
      }, {
        type:"txt",
        font:"20%",
        fillx:0,
        filly:1,
        halign:0, // CENTER align
        label:"Center"
      }, {
        type:"txt",
        font:"20%",
        fillx:0,
        filly:1,
        halign:1, // CERIGHTNTER align
        label:"Right"},
    ]
});

Debugging
Sometimes it is useful to be able to check how big an area Layout has allocated for certain elements, as this will determine the size of the area that gets cleared if you choose to render just a single element.
For this you can use layout.debug() which will draw different color boxes around each element:
var Layout = require("Layout");
var layout = new Layout( {
  type:"v", c: [
    {type:"h", c: [
      {type:"txt", font:"12x20:2", label:"One", pad:4 },
      {type:"txt", font:"12x20:2", label:"Two", pad:4 }
    ]},
    {type:"txt", font:"12x20:2", label:"Three", fillx:1 },
    {type:"h", c: [
      {type:"txt", font:"12x20:2", label:"4", fillx:1 },
      {type:"txt", font:"12x20:2", label:"5", fillx:2 }
    ]},
  ]
});
g.clear();
layout.render();
layout.debug();

Updating the screen
To redraw we have two main options. The first recommended option is just to use 'lazy' redraw.
Just specify {lazy:true} in the second argument of the Layout constructor, and
you can then call layout.render() when you want to redraw.
Layout will then be smart enough to redraw only the parts of the clock that have changed.
Note: Layout positions everything based on the contents that are in the text areas
when .update() or the first .render() is called (see Debugging above). As such you should pre-populate
label with the maximum size string you expect to be in it (or use fillx:1 - see Layout / Positioning below) before you call .render()
the first time - or to avoid flicker you can just call .update() which will work out the positions
of everything without drawing anything to the screen.
var Layout = require("Layout");
var layout = new Layout( {
  type:"v", c: [
    {type:"txt", font:"20%", label:"12:00", id:"time" }, // initial (maximum size) values
    {type:"txt", font:"6x8", label:"The Date", id:"date" }
  ]
}, {lazy:true});
layout.update(); // work out positions

// timeout used to update every minute
var drawTimeout;

// update the screen
function draw() {
  var d = new Date();
  // update time and date
  layout.time.label = require("locale").time(d,1);
  layout.date.label = require("locale").date(d);
  layout.render();
  // schedule a draw for the next minute
  if (drawTimeout) clearTimeout(drawTimeout);
  drawTimeout = setTimeout(function() {
    drawTimeout = undefined;
    draw();
  }, 60000 - (Date.now() % 60000));
}

// update time and draw
g.clear();
draw();
Your second option is to manually clear and update just the areas
you're interested in. For example here we use layout.clear(layout.time),
update the text, and then call layout.render(layout.time) to draw again.
This can be faster, but is also more fiddly and error-prone.
var Layout = require("Layout");
var layout = new Layout( {
  type:"v", c: [
    {type:"txt", font:"20%", label:"12:00", id:"time" }, // initial (maximum size) values
    {type:"txt", font:"6x8", label:"The Date", id:"date" }
  ]
});
g.clear();
layout.render(); // first call to layout.render() works out positions and draws

function draw() {
  var d = new Date();
  // update time
  var timeStr = require("locale").time(d,1);
  layout.clear(layout.time); // remove old time
  layout.time.label = timeStr;
  layout.render(layout.time); // redraw
  // check date and update if needed
  var dateStr = require("locale").date(d);
  if (layout.date.label != dateStr) {
    layout.clear(layout.date); // remove old date
    layout.date.label = dateStr;
    layout.render(layout.date); // redraw
  }

  queueDraw();
}

// timeout used to update every minute
var drawTimeout;

// schedule a draw for the next minute
function queueDraw() {
  if (drawTimeout) clearTimeout(drawTimeout);
  drawTimeout = setTimeout(function() {
    drawTimeout = undefined;
    draw();
  }, 60000 - (Date.now() % 60000));
}

draw();
Buttons / User Input
On Bangle.js you have one or more physical button depending on the version.
Layout provides smart handling of this for you, and will either use the physical
button or onscreen buttons depending on how many buttons have been requested.
For example this code will display 3 buttons:
var Layout = require("Layout");
var layout = new Layout( {
  type:"v", c: [
    {type:"txt", font:"6x8:2", label:"A Test", id:"label" }
  ]
}, {btns:[
  {label:"One", cb: l=>print("One"),  cbl: l=>print("One long press")},
  {label:"Two", cb: l=>print("Two")},
  {label:"Three", cb: l=>print("Three")}
], lazy:true});

function setLabel(x) {
  layout.label.label = x;
  layout.render();
}
g.clear();
layout.render(); // first call to layout.render() works out positions and draws
On Bangle.js 1 this'll just put 3 labels by the side of the physical buttons and will make them call the callback functions when they are pressed:

On Bangle.js 2, if there's one button it'll use the 'hard' button with a label (like above), or if there's more than one button it'll put buttons on the touchscreen down the side of the screen.

You can also do touchscreen buttons on Bangle.js 2 as well just by adding a btn:
var Layout = require("Layout");
var layout = new Layout( {
  type:"v", c: [
    {type:"txt", font:"6x8:2", label:"A Test", id:"label"},
    {type:"btn", font:"6x8:2", label:"One", cb: l=>setLabel("One") },
    {type:"btn", font:"6x8:2", label:"Two", cb: l=>setLabel("Two") }
  ]
}, {btns:[
  {label:"Three", cb: l=>setLabel("Three")}
], lazy:true});

function setLabel(x) {
  layout.label.label = x;
  layout.render();
}
g.clear();
layout.render(); // first call to layout.render() works out positions and draws

Finally, while the cb field is called for a normal button press, you can also
specify a cbl callback to be called when the button has been pressed for a
long time.
Images
Images can be supplied either as a function that returns the image (so the image data can remain in flash memory rather than RAM) or as the image string itself.
As function:
var Layout = require("Layout");
var layout = new Layout( {
  type:"h", c: [
    {type:"img", pad:4, src:function() { return require("heatshrink").decompress(atob("ikUwYFCgVJkgMDhMkyVJAwQFCAQNAgESAoQCBwEBBwlIgAFDpNkyAjDkm/5MEBwdf+gUEl/6AoVZkmX/oLClv6pf+DQn1/4+E3//0gFBkACBv/SBYI7D5JiDLJx9CBAR4CAoWQQ4Z9DgAA==")); }
 },
    {type:"txt", font:"6x8:2", label:"All ok"}
  ]
});

g.clear();
layout.render(); // first call to layout.render() works out positions and draws
As image string:
var Layout = require("Layout");
var layout = new Layout( {
  type:"h", c: [
    {type:"img", pad:4, src:require("heatshrink").decompress(atob("ikUwYFCgVJkgMDhMkyVJAwQFCAQNAgESAoQCBwEBBwlIgAFDpNkyAjDkm/5MEBwdf+gUEl/6AoVZkmX/oLClv6pf+DQn1/4+E3//0gFBkACBv/SBYI7D5JiDLJx9CBAR4CAoWQQ4Z9DgAA==")) },
    {type:"txt", font:"6x8:2", label:"All ok"}
  ]
});

g.clear();
layout.render(); // first call to layout.render() works out positions and draws

Custom elements
Sometimes something might be too complex or fiddly to lay out with Layout,
and in these cases you can use the custom type, which will call a function
for rendering of that specific field.
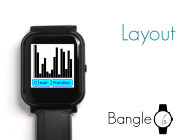
// Some data to graph
var data = new Array(16);
data.fill(0);

// Our custom renderer that draws a graph inside the layout
function renderGraph(l) {
  require("graph").drawBar(g, data, {
    miny: 0,
    axes : true,
    x:l.x, y:l.y, width:l.w, height:l.h
  });
}

// The layout, referencing the custom renderer
var Layout = require("Layout");
var layout = new Layout( {
  type:"v", c: [
    {type:"custom", render:renderGraph, id:"graph", bgCol:g.theme.bg, fillx:1, filly:1 },
    {type:"h", c: [
      {type:"btn", label:"Clear", cb: l=>{ data.fill(0); layout.render(layout.graph); }},
      {type:"btn", label:"Random", cb: l=>{ data=data.map(x=>Math.random()); layout.render(layout.graph); }},
    ]}
  ]
});

g.clear();
layout.render(); // first call to layout.render() works out positions and draws

Layout / Positioning
By default all items are laid out in the center of the screen (and
automatically stepped down if widgets have been loaded first with Bangle.loadWidgets()).
However often you'll want to arrange things differently, and there are several fields you can supply to help.
width/heightcan be manually specified (in pixels) for a specific fieldpad:3will add 3 pixels of padding around the edge of an elementfillx:1will make an element fill all available space in a horizontal layout, or if there are multiple elements withfillx:numberthen space will be spread accordingly.filly:1has the same effect but on vertical layouts- A
halignfield to set horizontal alignment.-1=left,1=right,0=center - A
valignfield to set vertical alignment.-1=top,1=bottom,0=center colwill specify a color for the text, eg#f00for redbgColis for background color (and if specified, any call torenderwill automatically clear the background)
More information
There are other layout options too. Check out the documentation at https://github.com/espruino/BangleApps/blob/master/modules/Layout.md for some examples.
This page is auto-generated from GitHub. If you see any mistakes or have suggestions, please let us know.