Quick Start (Bluetooth LE)
Turning On
Puck.js
Puck.js is either supplied with a separate battery, or assembled with the battery inside and a clear plastic tab between the battery and PCB to keep it turned off. To turn it on, you need to:
- Pull the silicone case off the top,
- Tip the PCB out
- If a battery is installed, push it out from the back with a blunt object and make sure the clear plastic tab is removed
- Push the battery back in, with the
+side of the battery (with the writing on) facing away from the Puck.js PCB. The red LED should flash once, very briefly. - If the green LED lights or red stays lit, it is because you have accidentally pressed the button down while inserting the battery. Remove the battery and try again, making sure the button next to the battery connector isn't pressed.
- Re-assemble Puck.js. To make sure the button works correctly you need to put
the battery side facing towards the plastic case, with the
Puck.js ...text against the shelf in the case itself
Please see the Puck.js reference page for some pictures of the correct orientation of the battery and Puck.js case.
While Puck.js ships with firmware that's fine for simple tasks, we're constantly improving the software and adding new features. To get the best out of it, we'd recommend that you update Puck.js's firmware first.
Pixl.js
To turn on your Pixl.js you have three main options:
- Use a Micro USB cable for power (there is no USB data connection on Pixl.js)
- Slide a CR2032 battery into the holder on the board (with
+facing away from the PCB) - Connect a power source (under 16v) between the
VinandGNDpins on Pixl.js
While Pixl.js ships with firmware that's fine for simple tasks, we're constantly improving the software and adding new features.
To get the best out of it, we'd recommend that you update Pixl.js's firmware first.
Jolt.js
To turn on your Jolt.js you have three main options:
- Use a USB-C cable for power
- Attach a LiPo battery to the JST battery connector on the board
- Power the board from the power pins on the terminal block
While Jolt.js ships with firmware that's fine for simple tasks, we're constantly improving the software and adding new features.
To get the best out of it, we'd recommend that you update Jolt.js's firmware first.
Bangle.js
Simply press BTN1 (the top right button) to power Bangle.js on.
If bluetooth connectivity is disabled (by default Bangle.js will be connectable):
- In your watch, press the middle button (BTN2)
- Use the bottom button (BTN3) to scroll down until you get to Settings
- Press BTN2 to select
- Either: Ensure
BLEandProgrammableareOnto enable programming permanently, and then chooseBackto exit settings - Or: Scroll down to
Make Connectable, select it, and leave Bangle.js displaying on theConnectablescreen
Check out The Bangle.js 'Getting Started' page for more information.
MDBT42Q
Check out the MDBT42Q page for more information about powering the MDBT42Q.
While pre-programmed MDBT42Q modules from us ship with firmware that's fine for simple tasks, we're constantly improving the software and adding new features.
To get the best out of it, we'd recommend that you update the firmware first.
Ruuvitag
Check out Ruuvi's getting started page for more information about powering MDBT42Q.
Nordic Thingy:52
You'll need to have your Thingy:52 flashed with Espruino and powered on. Check out the Thingy:52 page for more information.
Nordic nRF52832DK
Simply plug your nRF52832DK into a USB connector. You need to have it flashed with Espruino.
Once your device is powered up it'll start advertising itself via Bluetooth Low Energy.
Puck.js and Pixl.js will also act as NFC tags that can direct your NFC-capable phone to the relevant URLs.
Requirements
For Bluetooth LE you need a Bluetooth 4.0-capable adaptor in your computer (Bluetooth versions before 4.0 won't work). Pretty much all new computers come with Bluetooth 4, but you may need to get an external Bluetooth LE dongle if your computer:
- Is an Apple Mac made before 2012
- Is a Windows PC with a Windows version before 10
- Is a Desktop PC - it may not have any wireless support at all
If your computer doesn't have Bluetooth LE then Bluetooth LE USB adaptors and small, cheap (~$10), and easily available. There are two main types of USB Bluetooth Adaptor available:
- Broadcom chipset (eg. BCM20702) works well on all platforms.
- Cambridge Silicon Radio (CSR) - these work great on Linux and Windows. However while they used to work on Macs, Apple removed support in the High Sierra OS update - so you're better off with a Broadcom module.
To be sure that you get a usable adaptor we'd recommend that you buy ONLY adaptors that explicitly mention CSR or Broadcom in the descriptuon. The BlueGiga BLED112 module WILL NOT WORK - it is a serial port device, not a general purpose Bluetooth adaptor.
Common USB Bluetooth adaptors that have been tested and work are:
- iAmotus UD-400M - Broadcom BCM20702A1
- Plugable USB-BT4LE - Broadcom BCM20702A1
- Feasycom FSC-BP119 - CSR chipset with external antenna
- Whitelabel 06Q Nano - CSR chipset
- Whitelabel BM35 - CSR chipset
- Unbranded 'CSR 4.0' - CSR Chipset
Using your Espruino device
By default, Espruino appears as a Bluetooth Low Energy device with a serial port. When you connect to this serial port you get full command-line access to the Espruino Javascript interpreter built into it.
Note: Bluetooth LE serial ports (known as 'Nordic UART') will not appear in your Operating System's list of serial devices.
To get started you have two options:
- Use the Espruino IDE or command-line tools to write code to Espruino
- Send individual JavaScript commands to Espruino without programming it
Using the Espruino IDE
With Web Bluetooth
If your computer supports it, Web Bluetooth is the easiest way to get started with Espruino.
You'll need an up to date Chromium browser such as Google Chrome, Ungoogled Chromium, Edge or Opera (Brave will not work). Operating System support varies so for platform specific instructions see below:
Mac OS
OS X Yosemite or later required, and check that your Mac supports Bluetooth Low Energy:
- Click the Apple logo then
About this Macin the top left - Click
System Report - Click
BluetoothunderHardware - See if it says
Bluetooth Low Energy Supported
If it doesn't:
- Get a Bluetooth 4.0 (or later) adaptor (they cost ~$10) - see the requirements section above.
- Open a terminal and type
sudo nvram bluetoothHostControllerSwitchBehavior=always(to go back to the old behaviour typesudo nvram -d bluetoothHostControllerSwitchBehavior) - Reboot your Mac
- Make sure that you turn off (or un-pair) any Bluetooth devices that were using your internal Bluetooth - they may stop your Mac from using the new adaptor
If the Web Bluetooth option appears but you're unable to see any Bluetooth devices,
try: System Preferences —> Security & Privacy —> Bluetooth -> Add Google Chrome
Windows
Windows 10 fully supports Web Bluetooth, as long as you have an up to date version of Google Chrome (v70 or above) and your PC has a Bluetooth LE radio (all new Laptops will).
For those not wanting to use Google Chrome, you can use another Chromium based browser such as Cromite or Ungoogled Chromium (Brave will not work)
If you do not have Windows 10, you need to install the Espruino Native IDE application instead, as this is able to access the Bluetooth adaptor directly.
Linux
Linux is not officially supported in Chrome and is not enabled by default, but it does work.
To enable it:
- Type
chrome://flagsin the address bar - You need to enable
Experimental Web Platform Features(chrome://flags/#enable-experimental-web-platform-features). - Also enable
Use the new permissions backend for Web Bluetooth(chrome://flags/#enable-web-bluetooth-new-permissions-backend) if it exists - Restart your browser
You can also check out chrome://bluetooth-internals/#adapter to see what's happening - the Present item should be green (Bluetooth will still work even if not all items are green. Even if you have a built-in Bluetooth adaptor and that isn't working, you can just plug in an external Bluetooth adaptor (see the list above).
Other potential issues:
- Most Flatpaks don't work out of the box as Bluetooth priviledges aren't always turned on. You can change them using flatseal or can just install a native package for your OS.
- BlueZ 5.41+ required (5.43 is more stable) - you can check by typing
bluetoothd --version. Pretty much every Linux distribution from the past 5 years is now up to date, but if yours isn't there are some Bluez installation instructions here - Some Chromium based browsers such as Brave disable Bluetooth functionality. If you run into issues with a specific browser try an alternative browser from the list above.
Chromebook
All Chromebooks with Bluetooth should support Web Bluetooth.
Android
Android 6 (Marshmallow) or later are supported out of the box. You can use a Chromium based browser such as Google Chrome or Cromite
You can also use the Bangle.js Gadgetbridge app to provide app loader functionality for your Bangle.js (but not yet Web IDE).
Android 5 (Lollipop) devices can use Chromium installed over ADB to a developer mode device.
iOS (iPhone, iPad)
Apple's built-in web browser does not support Web Bluetooth. Instead you'll need to install a Web Browser that does support Web Bluetooth:
- WebBLE (recommended) - $1.99
- Bluefy - free
- Connect Browser - free
- Web Browser Connect - free
Once that is done you'll be able to access Web Bluetooth through any webpage viewed with the browser app (the app won't add Web Bluetooth to Safari).
Once Web Bluetooth is set up:
- Go to the Puck.js site. It should tell you that you have Web Bluetooth.
- Click the Web IDE option.
- Click the orange Connect/Disconnect icon in the Top Left:

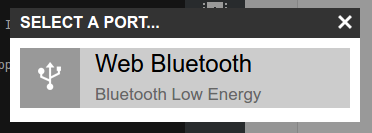
- You may see a list of connection options - choose
Web Bluetooth:

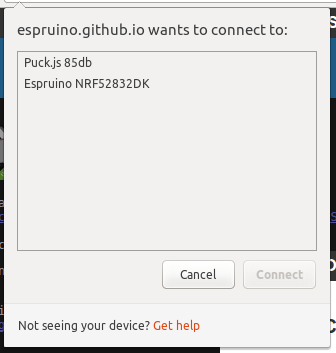
- You should be shown a list of devices - click on
YourDevice ABCD(whereABCDis the last 4 digits of your device's MAC address)

- Wait a few seconds - you should now be connected!
- You can now try writing some code!
With an application
On some platforms (Windows, or Linux with older versions of Bluez) Web
Bluetooth isn't supported yet.
On these you'll need to install a native application. We've created a Web IDE installer for Windows.
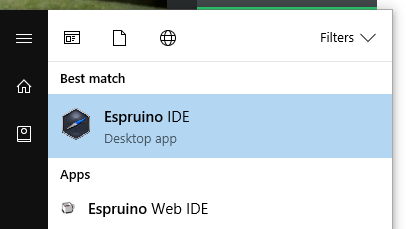
Once installed, you need to run Espruino IDE - which is confusingly
similar to the Espruino Web IDE which you may have had installed if you'd
used normal Espruino USB devices before.

Note:
- Bluetooth LE Serial devices (Nordic UART Service) like Espruino are not treated as serial port devices by Windows. If the IDE's connection menu shows devices beginning with the word
COM(eg.COM5), they are not your device and connecting to them won't work. - If using Windows 8.1/10 or later you'll need to pair your Espruino device using the Windows Bluetooth menu before it'll appear in the Web IDE. This is not needed for Web Bluetooth devices
- If you're using a Bluetooth dongle with Windows 10 you should use Windows' built-in Bluetooth software, rather than installing the software that came with your Bluetooth Dongle. Often the Bluetooth dongle's software will not pair with Bluetooth LE devices and expose them via Windows 10's API.
- If using Windows 7 you'll need to have set up your Bluetooth adaptor with Zadig first
On Linux, Mac OS and other platforms you'll need to follow the NPM install instructions on the Web IDE GitHub Page
Once set up, you can try writing some code!
Via a Raspberry Pi
There are two ways of using the Raspberry Pi to control Espruino devices.
You can use the Espruino Hub software (which provides an MQTT bridge) and the Node-RED UI - see the Node RED Tutorial
Or you can use the Raspberry Pi to host a web-based version of the Web IDE.
Once set up, you can try writing some code!
By wired connection
In the worst case, you don't have any computers that allow you to communicate using Bluetooth Low Energy.
But all is not lost! With many devices you can connect directly using a USB-TTL converter:
- Connecting Serial to Puck.js
- Connecting Serial to Pixl.js
- Connecting Serial to to the MDBT42Q
- Connecting Serial to to the Thingy:52
- The nRF52832DK has USB serial built-in
You can then use the normal Espruino Web IDE, which has separate instructions for Getting Started
Command-line
You can use the Espruino command-line app. It works under Node.js, so you'll need to:
- Install Node
- In a command prompt, type
npm install -g espruino(on Linux you'll want to usesudobefore the command) - On Linux, you need to run
sudo setcap cap_net_raw+eip $(eval readlink -f `which node`)to give node permissions for BLE (or you'll have to run it assudo) - When that completes, you can type
espruino --helpfor help - To connect, try
espruino --listto list devices, then copy your device's MAC address and typeespruino -p aa:bb:cc:dd:eeto connect. - Press
Ctrl-Ctwice to exit. - You can also type
espruino -p aa:bb:cc:dd:ee -w filename.jsto upload a file, enter terminal mode, and then re-upload it if it changes (so you can use your favourite editor) - You can now start writing some code!
Sending Individual Commands
Using Adafruit 'Bluefruit LE' app
This is the easiest solution on iOS
- Start the app
- Choose the Espruino device you want to communicate with and click
Connect - Click
UART - When connected you're ready to enter some commands - see
Commandsbelow
nRF UART app
- Start the app
- Tap
Connectand choose your Espruino device - Type commands into the console - see
Commandsbelow.
Note: In this app, you need to manually press the Enter key before sending a line. If you're on iOS you need to do this by copy/pasting out of code in notepad - which is much trickier (the Adafruit app above is easier).
A Website
You can use Web Bluetooth on your own website to control Espruino BLE devices, as long as you have a compatible browser.
While you can use Web Bluetooth directly, we've provided a helpful library. Just include
<script src="https://www.puck-js.com/puck.js"></script> in your website (served off HTTPS)
and you can easily execute commands just by running JS code like:
Puck.write('LED1.set();\n');
We've got a proper tutorial on it here
Your own app
You can make your own application to control Espruino for whatever platform you need.
For the simplest control, all you need to do is connect to the Espruino bluetooth
device and the characteristic with ID 6e400002b5a3f393e0a9e50e24dcca9e.
You can then write repeatedly to it to send commands to Espruino.
Commands...
Type in LED1.set() and click send.
- The red LED should light up.
- You can now type
LED1.reset()to turn it off.LED2andLED3work too - Note that responses are also being sent back. You can type in
BTN.read()andfalsewill be returned - it'll betrueif the button is pressed
Having Trouble?
Try:
- The Bluetooth Troubleshooting page
- General Troubleshooting
- Or ask on our forums if you can't find the answer you need
What now?
Please try the walkthrough to get started writing your first code for Espruino
There's lots of detailed information on specific boards, as well as a list of tutorials for them:
There is more general information:
- Bluetooth Troubleshooting
- Language Reference, specifically:
- Puck Object - for Puck.js specific functionality
- Pixl Object - for Pixl.js specific functionality
- NRF Object - for nRF52 Bluetooth functionality
- Global Functions and E Object - for built-in Espruino functionality
- Instantly Search all the Espruino website's documentation (using the box in the top right)
- List of available modules
- Tutorials
- Frequently Asked Questions
- See other ways of Programming Espruino devices
- Or check out our forums
Note: Espruino runs on many other devices, and espruino.com caters for all of them. Unless a tutorial explicitly says it is for your device it's possible that you will have to change some pin names and wiring to match the pins that you used on your device.
Power Usage
Out of the box, Espruino bluetooth devices don't draw that much power and can run for a while on a battery (see your board's specific reference page for more information). When they're running a small amount of JavaScript code once a minute or when a button is pressed the battery life won't be impacted significantly.
However, it's very easy to draw more power:
- Lighting a LED can draw around 100x more power than when idle
- Staying connected via Bluetooth will draw around 20x more power than idle while data is being transferred. After 1-2 minutes of inactivity Espruino will enter a lower bandwidth low power mode which draws about the same as if it was disconnected. On activity it'll go back up to the high power mode again.
- Running JavaScript code continuously (eg.
while(true);) will draw around 200x more power than at idle. Executing JavaScript on an event (egsetWatch(myCode, BTN)orsetInterval(myCode, 100000)draws negligible extra power).
As a result, if you've been experimenting with your device but don't intend to use the code
you've uploaded it's recommended that you either remove the battery, or connect
to your device and type reset(), to ensure that no code is running in the
background that might flatten the battery.
However for normal, non-buggy code power consumption is low enough that there is no reason not to leave the device powered on.
This page is auto-generated from GitHub. If you see any mistakes or have suggestions, please let us know.