iTracker RAK5010
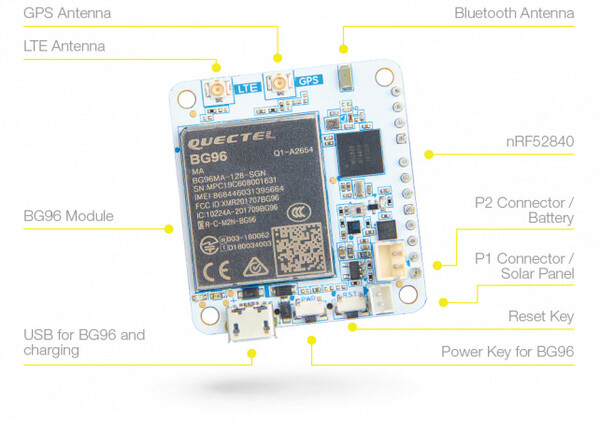
The RAK5010 is an advanced, highly flexible NB-IoT tracker based on Quectel BG96 LTE Cat M1&NB1, integrated with GPS, BLE and a variety of sensors. The MCU running the board is a Nordic nRF52840 controller.
With the GPS and BLE features, the device can be used in a wide range of applications from outdoor to indoor scenarios where location based service are necessary.
The board is equipped with four sensors on board: humidity and temperature sensor, pressure sensor, 3-axis motion sensor, and ambient light sensor. Additionally, the extension IOs in the module allow expandable sensor application in addition to the on-board ones.
This board is particularly suitable to be used as a quick testing and prototyping tool for applications requiring Nb-IoT connectivity. Application development supports the GCC environment.
Binaries can be found in:
- the Downloadable zip of firmare (current version)
- the binaries folder (current version)
- the automatic Travis Builds (cutting edge builds)
Contents
Using
Serial connection
When the iTracker powers on or is reset, if it detects a USB connection it will appear as a USB serial port device (USB CDC). Otherwise it can be programmed via Bluetooth LE.
iTracker is not yet able to detect a USB connection that is plugged in after it has started up
iTracker does contain two Serial ports, so you can use Serial2 for
communications while Serial1 is in use for GPS.
GPS
There is no separate GPS chip on the RAK5010. Instead, it is built into the BG96. Use as follows - this also turns the BG96 on if it wasn't already enabled.
require("iTracker").setGPSOn(true, function(err, gps) {
  /* gps contains: {
    at : AT command handler
    on : function(callback(err)) // turn GPS on (turned on automatically)
    off : function(callback(err)) // turn GPS off
    get : function(callback(data)) // get GPS data
  } */
  setInterval(function() {
    gps.get(function(data) {
      print("GPS", data);
      /* returns {error:...} on failure. 'ERROR: 516' means 'no fix'
         returns { raw : raw data as <UTC>,<latitude>,<longitude>,<hdop>,<altitude>,<fix>,<cog>,<spkm>,<spkn>,<date>,<nsat>
                   lat :   latitude in degrees,
                   lon :   longitude in degrees,
                   alt : altitude in m  } */
    });
  }, 10000);
});
Note you'll probably get GPS {"error": "ERROR: 516"} initally. This just means 'no fix' and
you just need to wait a few seconds/minutes until the data starts being populated properly.
Modem testing
The following code will power up the modem and report back the version number. It's a quick, easy way to test it without needing an active SIM.
var at;
console.log("Turning Cell on");
require("iTracker").setCellOn(true, function(usart) {
  console.log("Cell now on");
  at = require("AT").connect(usart);
  // at.debug(); // this enables printing of data received for debug purposes
  at.cmd("AT+GMR\r\n",1000,function cb(d) {
    if (d=="AT+GMR") return cb;
    if (d!="OK") console.log("Version is "+d);
  });
});
You can use the AT Module (click here fore more info) in this way to send your own custom commands
as well (it's also available as sms.at and gprs.at in the examples below.
SMS
See the ATSMS module for full documentation.
var sms;

console.log("Turning Cell on");
require("iTracker").setCellOn(true, function(usart) {
  console.log("Connecting SMS");
  var ATSMS = require("ATSMS");
  sms = new ATSMS(usart);
  //Use sms.at.debug(); here if you want debug messages

  sms.init(function(err) {
    if (err) throw err;
    console.log("Initialised!");

    sms.list("ALL", function(err,list) {
      if (err) throw err;
      if (list.length)
        console.log(list);
      else
        console.log("No Messages");
    });

    // and to send a message:
    //sms.send('+441234567890','Hello world!', callback)
  });

  sms.on('message', function(msgIndex) {
    console.log("Got new message, index ", msgIndex);
  });

  // when done use require("iTracker").setCellOn(false)
});
GSM/GPRS
See the QuectelBG96 module for full documentation. This handles proper internet access.
function connectionReady() {
  var http = require("http");
  http.get("http://www.pur3.co.uk/hello.txt", function(res) {
    res.on('data', function(data) {
      console.log(data);
    });
  });
}

var gprs;
console.log("Turning Cell on");
require("iTracker").setCellOn(true, function(usart) {
  console.log("Waiting 30 sec for modem to boot");
  setTimeout(function() {
    console.log("Connecting GPRS");
    gprs = require('QuectelBG96').connect(usart, {
      apn : "",
      username : "",
      password : "",
      // debug : true // to show raw AT command info
    }, function(err) {
      if (err) throw err;
      console.log("Connected!");
      connectionReady();
    });
    // gprs.debug(); // show just debug info from BG96 module
  }, 30000);
});
After a while Hello World! will be displayed - the contents of http://www.pur3.co.uk/hello.txt.
To use Hologram, all you need to do is change apn : "", to apn : "hologram", and upload the code.
NB-IoT
This blog post by Wolfgang Klenk shows how to get connected with Vodafone's NB-IoT in Germany.
Sensors
a = require("iTracker").setAccelOn(true, function() {
  console.log(a.read()); // {x,y,z}
});
// { "x": 0.439453125, "y": -0.14453125, "z": -0.150390625 }

o = require("iTracker").setOptoOn(true, function() {
  console.log(o.read());
});
// 217.44

p = require("iTracker").setPressureOn(true, function() {
  console.log(p.get());
});
p.on('data', print);
// { "pressure": 1011.04125976562, "temperature": 25.79, "new": true }

e = require("iTracker").setEnvOn(true, function() {
  e.read(function(d) {
    print(d);
  });
});
// { "humidity": 42.67883300781, "temp": 24.81201171875 }
Reference
iTracker.setGPSOn = function(isOn, callback) { ... }
Return GPS instance. callback is called whenever data is available!
iTracker.setEnvOn = function(isOn, callback) { ... }
Returns SHT3C instance. callback when initialised. Then use 'read(callback)' to get data
iTracker.setAccelOn = function(isOn, callback) { ... }
Returns a LIS3DH instance. callback when initialised. Then use read to get data
iTracker.setOptoOn = function(isOn, callback) { ... }
Returns a OPT3001 instance. callback when initialised. Then use read to get data
iTracker.setPressureOn = function(isOn, callback) { ... }
Returns a LPS22HB instance. callback when initialised. Then use 'get' to get data, or the on('data' event
iTracker.setCellOn = function(isOn, callback) { ... }
Turn cell connectivity on - will take around 8 seconds. Calls the callback(usart) when done. You then need to connect either ATSMS or QuectelBG96 to the serial device usart
iTracker.setCharging = function(isCharging) { ... }
Set whether the TP4054 should charge the battery (default is yes)
iTracker.isCharging = function() { ... }
Get whether the TP4054 is charging the battery
NRF_IO1 / NRF_IO2 / NRF_IO3 / NRF_IO4
IO pins. Note - these need VREF to be connected to 3.3v to function
AIN
Analog input pin
PINS
List of IO pins
i2c
I2C interface used for communicating with on-board peripherals
Tutorials
First, it's best to check out the Getting Started Guide
Tutorials using Bluetooth LE:
 Battery Monitor
 BTHome Library
 Bluetooth Characteristic Notifications
 LEGO WeDo 2.0
") LEGO Power Functions Clone Remote Control (Mould King M-0006 / Kaiyu / Bandra / AKOGD / MayD / etc)
LEGO Power Functions Clone Remote Control (Mould King M-0006 / Kaiyu / Bandra / AKOGD / MayD / etc)
") Quick Start (Bluetooth LE)
Quick Start (Bluetooth LE)
 Pixl.js Bluetooth to Ethernet MQTT Bridge
 Bluetooth LE Printers
 Bluetooth LE Emoji Advertising
 Tilt Hydrometer Repeater
 BLE Advertising with Node.js/Python/C#/Android
 Automatic Data Download
 Puck.js to GCP BigQuery & Data Studio
 Stream from Puck.js to AWS IOT Core & SNS Email
") Bluetooth LE UARTs (NUS)
Bluetooth LE UARTs (NUS)
 Bluetooth LE HID Keyboards
 Bluetooth LE Security and Access Control
 Bluetooth LE MIDI
 Web Bluetooth on Linux
 Bluetooth Time Setter
 Using Web Bluetooth with Espruino
 Bluetooth LE and If This Then That
 UART.js Library
 Eddystone Beacons
 Bluetooth LE and Node-RED with MQTT
 Bluetooth Music Controller
 Controlling Bluetooth Lights with Puck.js
 Bluetooth LE HTTP Proxies
 Exercise Machine controlled Video
 BLE Communications
") About Bluetooth LE (BLE)
About Bluetooth LE (BLE)
 Puck.js with SMS control
 Pixl.js SMS Remote Monitoring
 Web IDE on a Raspberry Pi
 Puck.js Bluetooth with the Graphical Editor
 Controlling Other BLE Espruino Devices
 Pixl.js Simple Logger
 Pixl.js Multiplayer Pong Game
 BLE Characteristic Scan
LED BLE Library
Bluefruit LE app interface
BLE Characteristic Scan
LED BLE Library
Bluefruit LE app interface
Tutorials using Bluetooth LE and functionality that may not be part of the iTracker:
 DIY Smart Meter
 BTHome and Home Assistant Setup
 BTHome Door Sensor for Home Assistant
 Water Level Monitor
 Puck.js Vibration Sensor
 Interfacing to a PC
 Pixl.js Wireless Temperature Display
 Turning an Espruino Puck.js Into a Universal Presentation Clicker
 Controlling Espruino from Tensorflow on the Desktop
 Bookmarklets with Web Bluetooth
 Bangle.js Data Streaming
 Puckmote - Universal Remote Control
 IoT for Kitchen Gardens
 Time Machine Retro-Inspired Smartwatch
 Talos, Keeping You Safe During Your Commute
 Bluetooth Energy Usage Monitor
 Electric Skateboard Controller
 Wooden Bluetooth Remote for Lego Duplo Train
 Puck.js Control from Android using DroidScript
 Ikea Eneby Speaker Controller
 Pixl.js Wireless Weather Station
 Temperature Controlled Night Light with Puck.js
 Infrared Record and Playback with Puck.js
 Door Controlled Light with Puck.js
 Freezer Alarm
Pinout
Hover the mouse over a pin function for more information. Clicking in a function will tell you how to use it in Espruino.
- Purple boxes show pins that are used for other functionality on the board. You should avoid using these unless you know that the marked device is not used.
- ! boxes contain extra information about the pin. Hover your mouse over them to see it.
- 3.3v boxes mark pins that are not 5v tolerant (they only take inputs from 0 - 3.3v, not 0 - 5v).
- GND is ground (0v).
- VBAT is the battery voltage output (see the Espruino Board Reference).
- ADC is an Analog to Digital Converter (for reading analog voltages)
Firmware Updates
You need to attach a nRF52DK or other SWD programmer to the SWDCLK
and SWDIO pins, then upload the hex file by copying it to the JLINK drive
or using nrfjprog.
This page is auto-generated from GitHub. If you see any mistakes or have suggestions, please let us know.