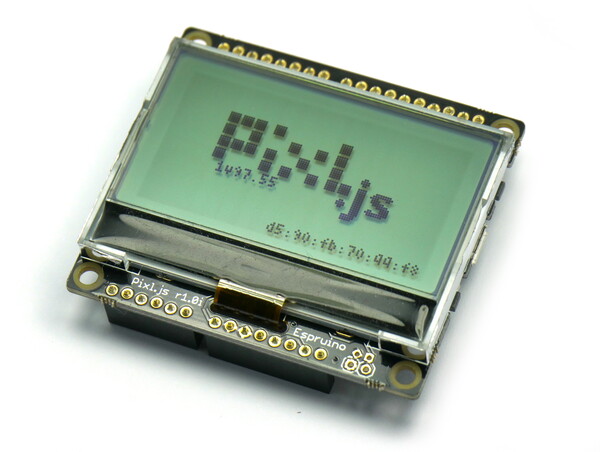
Pixl.js
Buy Now
Pixl.js is a smart LCD with Bluetooth LE.
Monitor and control other Bluetooth LE devices, act as a wireless display, create your own smart conference badge, or even just display the status of your code - all while drawing tiny amounts of power.
Pixl.js's unique design allows you to use the Arduino footprint to interface with the huge array of existing Arduino shields, while still using the LCD and buttons. Add Ethernet, WiFi, Motor drivers, even GSM. No soldering required!
Just got your Pixl.js? Take a look here!
Contents
Features
- Bluetooth Low Energy
- Espruino JavaScript interpreter pre-installed
- nRF52832 SoC - 64MHz ARM Cortex M4, 64kB RAM, 512kB Flash
- 54mm diagonal, 128 x 64 Sunlight readable monochrome display with white backlight
- 20x GPIO in Arduino footprint (capable of PWM, SPI, I2C, UART, Analog Input)
- Support for GSM, LTE, WiFi and Ethernet Arduino shields
- 2.5v to 16v input range (0.3mA idle)
- CR2032 battery holder, or Micro USB (power only)
- 4x 3mm mounting holes
- 4x Buttons
- Built in thermometer and battery level sensors
- NFC tag programmable from JavaScript
- Dimensions: 60mm x 53mm x 15mm (2.4 x 2.1 x 0.6 inches)
Powering Pixl.js
Pixl.js can be powered in multiple ways:
- Micro USB - the Micro USB connector can easily provide power to your Pixl.js (there is no data connection)
- CR2032 Lithium battery - a CR2032 battery will power Pixl.js for around 20 days with light JavaScript usage
Vinpins - available via the Arduino header, or the separate pin header to the side. You can supply 3v - 16v which is regulated down to 3.3v for Pixl.js. The unpopulated pins to the side are spaces to accommodate a connector for JST PHR-2 Batteries.- CR2032 LiPo battery - you can not use a CR2032 LiPo battery without some minor modifications as the voltage is too high. There is a small solder jumper below the CR2032 holder. Cut the existing connection and solder between the other two pads. This causes the battery to be connected via the voltage regulator. Note: the LiPo will then be connected directly to Vin, and you will be unable to use the USB for power (as it'll connect to LiPo to 5v).
- CR2032 battery backup - the CR2032 can be used as a backup when Vin/USB power is not present. Cut the trace in the solder jumper below the CR2032 holder, and add a surface mount diode to the two pads to the right of it.
Vin pins
As mentioned above you can solder a JST connector (part number B2B-PH-K-S to Pixl.js):
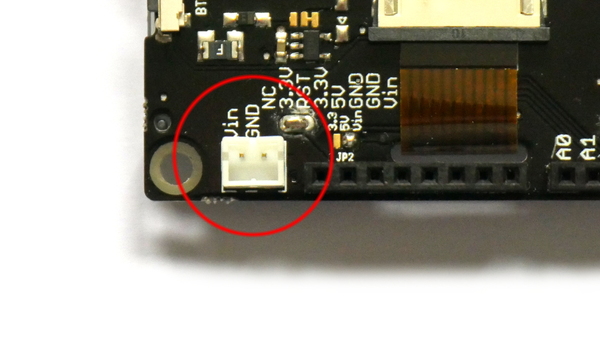
Note: This connects stright to the Vin pins, so you should use USB
or CR2032 or the JST connector, but not more than one at the same time!
Power Consumption
All power figures below are with the LCD on:
- No advertising,
Pixl.setLCDPower(0)- 20uA - Advertising - 320uA
- Connected via BLE - 500uA
- Backlight on - 5mA
- 100% CPU usage running JavaScript - 5mA
- Backlight on, 100% CPU usage running JavaScript - 10mA
- Using NRF.findDevices to scan for devices - 12mA
This means that when running off a CR2032 battery you could expect around 20 days of battery life with light JavaScript usage, LCD on, and no backlight. Life can be significantly improved by turning the LCD off when it is not needed.
Pixl.js sends advertising data without ever executing JavaScript. To get the best power consumption, make sure your code executes as rarely as possible.
Resetting Pixl.js
Occasionally you may want to hard-reset Pixl.js. To do this:
- With a CR2032 Battery - Remove and replace the battery. It helps to remove the battery by pushing it out from behind using something thin like a matchstick. If you intend to reset Pixl.js multiple times you can only half-insert the battery to make it easier to remove.
- On USB Power - disconnect and re-connect the USB plug
For short (1 second) periods of time you can also just short out the 3v power rail. Do to this take something metallic and touch it between the top of the CR2032 Battery/holder and the USB socket's metal outer.
Resetting Pixl.js this way will not clear out any saved code - see Hard Reset below.
Hard Reset
To clear out all saved code, reset Pixl.js while keeping BTN1 held for around 10 seconds (even while Pixl.js says SELF TEST Release BTN1).
Once Pixl.js displays Removed saved code from Flash you can release it - this will clear out any previously saved code and bonding data that could have caused problems.
Note: If you release BTN1 when instructed by the text Release BTN1 then a self-test will be performed. Saved code will not be loaded from flash, but will not be erased from flash either - a subsequent reset will start Espruino up loading the saved code as normal.
Tutorials
First, it's best to check out the Getting Started Guide
There is more information below about using the LCD and onboard peripherals as well.
Tutorials using Pixl.js:
") Quick Start (Bluetooth LE)
Quick Start (Bluetooth LE)
 Pixl.js Bluetooth to Ethernet MQTT Bridge
") Arduino Ethernet and SD card shield (WIZnet W5100)
Arduino Ethernet and SD card shield (WIZnet W5100)
 nRF52 Low Level Interface Library
 Graph Library
 Tilt Hydrometer Brew Display with Pixl.js
 Dinosaur Game
") Advanced Debug (SWD)
Advanced Debug (SWD)
 Pixl.js Wireless Temperature Display
 Adding a Custom Boot Screen
 Web NFC, and writing to NFC tags
 Pixl.js and Bangle.js Menus
 IoT for Kitchen Gardens
 Power Meter
 Arduino ESP8266 WiFi Shield
 Arduino Motor Shield
 USB Host Support
 NB-IoT Explorer
") Quick Start (Writing Code)
Quick Start (Writing Code)
 Puck.js Control from Android using DroidScript
 Asteroids Game
 Flappy Bird Game
 Pixl.js SMS Remote Monitoring
 Pixl.js Wireless Weather Station
 Arduino Relay Shield
 Freezer Alarm
 Pixl.js Simple Logger
 Pixl.js Pong Game
 Pixl.js Multiplayer Pong Game
 Morphing 7 Segment Clock
 Micro:Bit Voting
 Sending Text to Micro:Bit
") Arduino GPRS/GSM shield (SIM900)
Arduino GPRS/GSM shield (SIM900)
 Pixl.js Home Computer
 Pixl.js Spectrum Analyser
 Pixl.js Oscilloscope
 Pixl.js Clock
 Animal Guessing Game
 Platform Game
 Pixl.js Temperature Display
 UI Example - Slider for Pixl.js
UI Example - Radio Buttons for Pixl.js
UI Example - Checkbox on Pixl.js
UI Example - Buttons on Pixl.js
UI Example - all ui elements on Pixl.js
nRF52 Accurate Stepper Motor Driver
UI Example - Slider for Pixl.js
UI Example - Radio Buttons for Pixl.js
UI Example - Checkbox on Pixl.js
UI Example - Buttons on Pixl.js
UI Example - all ui elements on Pixl.js
nRF52 Accurate Stepper Motor Driver
Tutorials using Bluetooth LE:
 LEGO WeDo 2.0
") LEGO Power Functions Clone Remote Control (Mould King M-0006 / Kaiyu / Bandra / AKOGD / MayD / etc)
LEGO Power Functions Clone Remote Control (Mould King M-0006 / Kaiyu / Bandra / AKOGD / MayD / etc)
 BTHome Library
 Bluetooth LE Printers
 Bluetooth LE Emoji Advertising
 Battery Monitor
 Tilt Hydrometer Repeater
 BLE Advertising with Node.js/Python/C#/Android
 Automatic Data Download
 Puck.js to GCP BigQuery & Data Studio
 Stream from Puck.js to AWS IOT Core & SNS Email
") Bluetooth LE UARTs (NUS)
Bluetooth LE UARTs (NUS)
 Bluetooth LE HID Keyboards
 Bluetooth LE Security and Access Control
 Bluetooth LE MIDI
 Web Bluetooth on Linux
 Bluetooth Time Setter
 Using Web Bluetooth with Espruino
 Bluetooth LE and If This Then That
 UART.js Library
 Eddystone Beacons
 Bluetooth LE and Node-RED with MQTT
 Bluetooth Music Controller
 Controlling Bluetooth Lights with Puck.js
 Bluetooth LE HTTP Proxies
 Exercise Machine controlled Video
 BLE Communications
") About Bluetooth LE (BLE)
About Bluetooth LE (BLE)
 Puck.js with SMS control
 Web IDE on a Raspberry Pi
 Puck.js Bluetooth with the Graphical Editor
 Controlling Other BLE Espruino Devices
BLE Characteristic Scan
LED BLE Library
Bluefruit LE app interface
Controlling Other BLE Espruino Devices
BLE Characteristic Scan
LED BLE Library
Bluefruit LE app interface
Tutorials using Bluetooth LE and functionality that may not be part of Pixl.js:
 Water Level Monitor
 Puck.js Vibration Sensor
 DIY Smart Meter
 BTHome Door Sensor for Home Assistant
 BTHome and Home Assistant Setup
 Turning an Espruino Puck.js Into a Universal Presentation Clicker
 Interfacing to a PC
 Controlling Espruino from Tensorflow on the Desktop
 Bookmarklets with Web Bluetooth
 Bangle.js Data Streaming
 Puckmote - Universal Remote Control
 Time Machine Retro-Inspired Smartwatch
 Talos, Keeping You Safe During Your Commute
 Bluetooth Energy Usage Monitor
 Electric Skateboard Controller
 Wooden Bluetooth Remote for Lego Duplo Train
 Ikea Eneby Speaker Controller
 Temperature Controlled Night Light with Puck.js
 Infrared Record and Playback with Puck.js
 Door Controlled Light with Puck.js
There are many more tutorials that may not be specifically for you device but will probably work with some tweaking. Try searching to find what you want.
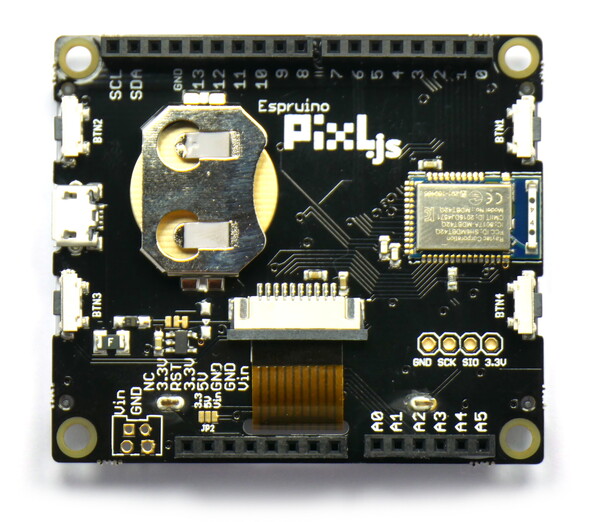
Pinout
Hover the mouse over a pin function for more information. Clicking in a function will tell you how to use it in Espruino.
- Purple boxes show pins that are used for other functionality on the board. You should avoid using these unless you know that the marked device is not used.
- ! boxes contain extra information about the pin. Hover your mouse over them to see it.
- 3.3v boxes mark pins that are not 5v tolerant (they only take inputs from 0 - 3.3v, not 0 - 5v).
- GND is ground (0v).
- ADC is an Analog to Digital Converter (for reading analog voltages)
Pins not on connectors
Pins on the Arduino header are accessed via the built-in variables D0..D13 and A0..A5.
Note: Pixl.js has one available I2C, SPI and USART (and infinite software SPI and I2C). Unlike STM32-based Espruino boards, these peripherals can be used on any pin.
Arduino Shields
Pixl.js is a 3.3v device, and is only designed for 3.3v shields.
Shield power
If you find that your shield isn't powered, it may be because the 5v pin on
the Arduino shield isn't connected. There is a solder jumper near the LCD
connector labelled 3.3 5V Vin, and you can apply solder to:
- short 3.3 to 5v - the 5v pin will be connected to regulated 3.3v power (note: max power draw is 150mA)
- short Vin to 5v - the 5v pin will be connected to 5v (when connected via USB) or whatever the voltage provided on Vin is
Do not short all 3 pins of the solder jumper together! This will connect 3.3v to Vin, which will power your Pixl's processor (and the LCD) directly from Vin, which is likely to be a high enough voltage that it will permanently damage it.
Shields
Here are some of the Arduino shields that we have tested and documented:
Arduino Ethernet and SD card shield (WIZnet W5100)
Arduino ESP8266 WiFi Shield
Arduino Motor Shield
Arduino Relay Shield
Arduino GPRS/GSM shield (SIM900)
 SeeedStudio Grove System
Information
- There's an API reference here
- Circuit Diagram
- Board Layout
- Eagle CAD files
- nRF52832 Datasheet
- MDBT42 Datasheet
- 3D model of Pixl.js in STL or OpenSCAD
- SVG Vector drawing of Pixl.js with laser-cut case
Certifications:
- Pixl.js's radio module has certifications for FCC (USA), CE(EU), TELEC (Japan), SRRC (China), IC (Canada), NCC (Taiwan) and KC (South Korea)
LCD Screen
NOTE: When you get it, your Pixl has a protective film over the front of the LCD. It may appear scuffed of scratched, but can easily be peeled off from one corner.
Pixl.js displays the REPL (JavaScript console) by
default, so any calls like print("Hello") or console.log("World") will output
to the LCD when there is no computer connected via Bluetooth or Serial.
Any errors generated when there is no connection will also be displayed on the LCD.
Graphics
You can output graphics on Pixl.js's display via the global variable g
that is an instance of the Graphics class. The display
is double-buffered, so when you want the changes you made to be displayed
you need to call g.flip():
// Draw a pattern with lines
g.clear();
for (i=0;i<64;i+=7.9) g.drawLine(0,i,i,63);
g.drawString("Hello World",30,30);
// Update the display when done
g.flip();
Screen updates
g.flip() only updates the area of the screen that has been
modified by Graphics commands. If you're modifying the underlying buffer
(g.buffer) then use g.flip(true) to update the entire screen contents.
Menus
Pixl.js comes with a built-in menu library that can be accessed with the Pixl.menu() command.
// Two variables to update
var boolean = false;
var number = 50;
// First menu
var mainmenu = {
  "" : {
    "title" : "-- Main Menu --"
  },
  "Backlight On" : function() { LED1.set(); },
  "Backlight Off" : function() { LED1.reset(); },
  "Submenu" : function() { Pixl.menu(submenu); },
  "A Boolean" : {
    value : boolean,
    format : v => v?"On":"Off",
    onchange : v => { boolean=v; }
  },
  "A Number" : {
    value : number,
    min:0,max:100,step:10,
    onchange : v => { number=v; }
  },
  "Exit" : function() { Pixl.menu(); },
};
// Submenu
var submenu = {
  "" : {
    "title" : "-- SubMenu --"
  },
  "One" : undefined, // do nothing
  "Two" : undefined, // do nothing
  "< Back" : function() { Pixl.menu(mainmenu); },
};
// Actually display the menu
Pixl.menu(mainmenu);
See http://www.espruino.com/graphical_menu for more detailed information.
Contrast
You can change the LCD screen's contrast with Pixl.setContrast(0.5) with
a number between 0 and 1.
You can also write single byte commands to the ST7567 LCD controller using
the Pixl.lcdw(...) command if you want to experiment with different LCD modes.
Terminal
Pixl.js's LCD acts as a VT100 Terminal. To write text to the LCD regardless of
connection state you can use Terminal.println("your text"). Scrolling
and simple VT100 control characters will be honoured.
You can even move the JavaScript console (REPL) to the LCD while connected via Bluetooth, and use your bluetooth connection as a simple keyboard using the following commands:
Bluetooth.on("data",d=>Terminal.inject(d));
Terminal.setConsole();
Power Usage
When on, the LCD draws around 200uA (0.2mA). You can turn the LCD off to save power with Pixl.setLCDPower(true/false) if you need to. When resuming, the LCD will be refreshed to display what was previously on the screen.
Splash Screen
When it first boots, Pixl.js animates the Pixl.js logo onto the screen. Subsequent
calls to reset() display it but skip the animation. If you'd like your own splash screen,
on Espruino firmware 2v05 and later you can
write a 1bpp image string made using the Image Converter to the Storage file
.storage, for example to display a QR code you could do:
require("Storage").write(".splash",E.toArrayBuffer(atob("gEABAAAAAAAAAAAAAAAAAAAAAAAAAAAAAAAAAAAAAAAAAAAAAAAAAAAAAAAAAAAAAAAAAAAAAAAAAAAAAAAAAAAAAAAAAAAAAAAAAAAAAAAAAAAAAAAAAAAAAAAAAAAAAAAAAAAAAAAAAAAAAAAAAAAAAAAAAAAB//gZ4Z//gAAAAAAAAAAAAf/4GeGf/4AAAAAAAAAAAAGAGZh/mAGAAAAAAAAAAAABgBmYf5gBgAAAAAAAAAAAAZ+YAZgZ+YAAAAAAAAAAAAGfmAGYGfmAAAAAAAAAAAABn5n5/hn5gAAAAAAAAAAAAZ+Z+f4Z+YAAAAAAAAAAAAGfmGBhmfmAAAAAAAAAAAABn5hgYZn5gAAAAAAAAAAAAYAZ554YAYAAAAAAAAAAAAGAGeeeGAGAAAAAAAAAAAAB//mZmZ//gAAAAAAAAAAAAf/5mZmf/4AAAAAAAAAAAAAAAH4ZgAAAAAAAAAAAAAAAAAB+GYAAAAAAAAAAAAAAAf+f5gBmZgAAAAAAAAAAAAH/n+YAZmYAAAAAAAAAAAAB/geZ4GYGAAAAAAAAAAAAAf4HmeBmBgAAAAAAAAAAAAHn/5h/n+eAAAAAAAAAAAAB5/+Yf5/ngAAAAAAAAAAAAH5ngeGYAYAAAAAAAAAAAAB+Z4HhmAGAAAAAAAAAAAABgHn5mH+fgAAAAAAAAAAAAYB5+Zh/n4AAAAAAAAAAAABnh+AB5mYAAAAAAAAAAAAAZ4fgAeZmAAAAAAAAAAAAAGeZh4YeZ4AAAAAAAAAAAABnmYeGHmeAAAAAAAAAAAAAZ+fmGYZhgAAAAAAAAAAAAGfn5hmGYYAAAAAAAAAAAABmf54B/5gAAAAAAAAAAAAAZn+eAf+YAAAAAAAAAAAAAAABgf+B+AAAAAAAAAAAAAAAAYH/gfgAAAAAAAAAAAAB//n4eZn/gAAAAAAAAAAAAf/5+HmZ/4AAAAAAAAAAAAGAGHnhgeYAAAAAAAAAAAABgBh54YHmAAAAAAAAAAAAAZ+Z+Z//+YAAAAAAAAAAAAGfmfmf//mAAAAAAAAAAAABn5ngAHmfgAAAAAAAAAAAAZ+Z4AB5n4AAAAAAAAAAAAGfmeeH5hmAAAAAAAAAAAABn5nnh+YZgAAAAAAAAAAAAYAZ/h//4YAAAAAAAAAAAAGAGf4f/+GAAAAAAAAAAAAB//mGAH//gAAAAAAAAAAAAf/5hgB//4AAAAAAAAAAAAAAAAAAAAAAAAAAAAAAAAAAAAAAAAAAAAAAAAAAAAAAAAAAAAAAAAAAAAAAAAAAAAAAAAAAAAAAAAAAAAAAAAAAAAAAAAAAAAAAAAAAAAAAAAAAAAAAAAAAAAAAAAAAAAAAAAAAAAAAAAAAAA==")))
Or to skip the splash screen completely, you can just write a zero-length file:
require("Storage").write(".splash","");
On-board LED, Buttons and GPIO
LED
The only LED available on Pixl.js is the backlight, which is controllable via
the LED or LED1 variable.
digitalWrite(LED,1),LED.write(1)orLED.set()turns the backlight ondigitalWrite(LED,0),LED.write(0)orLED.reset()turns the backlight off
Buttons
There are 4 buttons on Pixl.js. Starting in the top left, going clockwise, they are BTN1, BTN2, BTN3 and BTN4.
- You can access a button's state with
digitalRead(BTN1)orBTN1.read()(the two commands are identical).BTNis also defined, and is the same asBTN1. - Polling to get the button state wastes power, so it's better to use
setWatchto call a function whenever the button changes state:
setWatch(function() {
  console.log("Pressed");
}, BTN, {edge:"rising", debounce:50, repeat:true});
GPIO pins
GPIO pins are numbered D0 to D13 and A0 to A5 (matching the Arduino header). They are marked on the PCB (for D0 to D13, the D is omitted).
You can use the same digitalWrite/digitalRead commands with these that you
did with the LEDs and buttons, but you can also use PWM, I2C, SPI and Analog.
NFC - Near Field Communications
To set Puck.js up to redirect to a new NFC URL, just use NRF.nfcURL(...):
NRF.nfcURL("http://espruino.com");
or to turn off, call it with no arguments:
NRF.nfcURL();
Other NFC functionality is available - check out the reference for NRF.nfc*
methods and events, and see the Web NFC page for information
on transferring data via NFC.
Known Problems
On the 2v01 firmware release (which the first Pixl.js shiped with), NFC doesn't work.
If you upgrade, 2v02 firmware and later have this fixed.
Serial Console
When power is first applied, Pixl.js checks if pin D0 is at 3.3v (which will be the
case if it is connected to a Serial port's transmit line). If it is, it initialises
the on-chip UART on D0 (Pixl.js RX) and D1 (Pixl.js TX) and puts the Espruino
console (REPL) on it at 9600 baud.
To use it, connect to a 3.3v output USB to TTL converter as follows:
| Pixl.js | USB->TTL converter |
|---|---|
GND |
GND |
D1 |
RX ( -> PC ) |
D0 |
TX ( <- PC ) |
Vin |
5v (Optional - to run without a battery) |
You can now use the normal Espruino Web IDE, or a serial terminal application at 9600 baud.
When you connect via Bluetooth, the console will automatically move over. To
stop this, execute Serial1.setConsole(true) to force the console to stay on
Serial1.
Note: Serial1 is not enabled by default because it requires the high speed oscillator to stay on, which increases power draw a huge amount. If you connect the UART but don't power down and power on Pixl.js, you won't get a serial port.
Firmware Updates
Please see the Firmware Update page for detailed instructions.
Different Firmwares
We provide two distinct firmwares for Pixl.js devices:
| Filename | Espruino | BLE | NFC | Neopixel | JIT | HTTP/Network | WIZnet W5100 Ethernet | Flash Storage |
|---|---|---|---|---|---|---|---|---|
espruino_2vxx_pixljs.zip |
X | X | X | X | X | X | 36kb | |
espruino_2vxx_pixljs_wiznet.zip |
X | X | X | X | X | X | 36kb |
Pixl.js come pre-installed with the first (normal) firmware, but if you need support for the [WIZnet W5100 shield](/arduino-w5100]
as+of+2v25+you'll have to install the espruino_2vxx_pixljs_wiznet.zip firmware.
Troubleshooting
For more answers please check out the Bluetooth Troubleshooting or General Troubleshooting pages.
My Pixl's screen was scratched when I got it!
The Pixl comes with a protective film over the LCD. The film itself is very soft which means it picks up scratches during manufacture and packing, however it is easy to peel off from one corner and will reveal a shiny new LCD.
Other Official Espruino Boards


This page is auto-generated from GitHub. If you see any mistakes or have suggestions, please let us know.