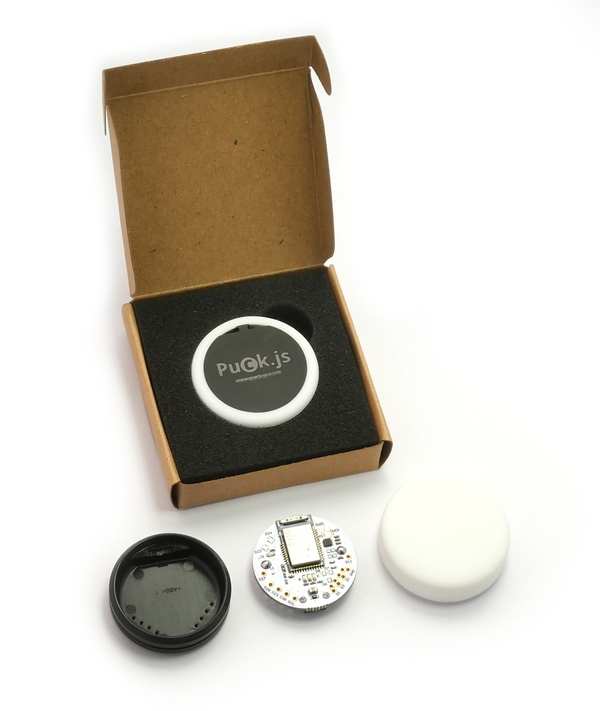
Puck.js
Buy Now
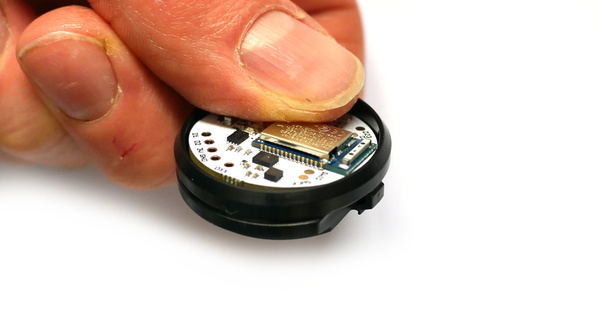
Puck.js is an easy to use, programmable Bluetooth sensor and button
You can customise Puck.js with JavaScript or a graphical programming language (Blockly). All you need is a Web Browser (Chrome, Edge or Opera) and you can upload code wirelessly! Puck.js comes with bluetooth low energy, accelerometer, gyro, 3 axis compass, temperature sensor, IR, NFC and more!
Just got your Puck.js? Click here to get started!
Contents
- Features
- Accessories
- Turning Puck.js on
- Resetting Puck.js
- Hard Reset
- Tutorials
- Pinout
- Information
- On-board LEDs, Button and GPIO
- On-board peripherals
- Magnetometer
- Accelerometer/Gyro
- IR / Infrared
- NFC - Near Field Communications
- Light sensor
- Bluetooth
- Temperature
- Battery level
- Capacitive sense
- FET
- Serial Console
- Power Consumption
- Firmware Updates
- Troubleshooting
- Other Official Espruino Boards
Features
- Bluetooth Low Energy
- Espruino JavaScript interpreter pre-installed
- nRF52832 SoC - 64MHz ARM Cortex M4, 64kB RAM, 512kB Flash
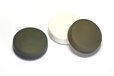
- ABS plastic rear case with lanyard mount
- Silicone cover with tactile button
- IR Transmitter
- Built in thermometer, light and battery level sensors
- Red, Green and Blue LEDs
- NFC tag programmable from JavaScript
- Pin capable of capacitive sensing
- Weight: 14g in plastic case, 20g in packaging
- Dimensions of cardboard box: 64mm x 62mm x 16mm
- Dimensions of plastic case: 36mm dia, 12.5mm thick
- Dimensions of bare PCB: 29mm dia, 9mm thick
| Features | Puck.js v1 | Puck.js v2 | Puck.js v2.1 |
|---|---|---|---|
| 0.1" GPIO | 8 | 7 | 7 |
| SMD GPIO | 9 | 2 | 2 |
| Magnetometer | MAG3110 | LIS3MDLTR | MMC5603NJ |
| Accelerometer | No | LSM6DS3TR-C | LSM6DS3TR-C |
| Gyro | No | LSM6DS3TR-C | LSM6DS3TR-C |
| Temperature Sensor | nRF52 (uncalibrated) | PCT2075TP (calibrated) | PCT2075TP (calibrated) |
| MOSFET Output | No | 1x | 1x |
Accessories
You can also buy kits of different color cases for Puck.js from the Espruino Shop.

Turning Puck.js on
Puck.js is either supplied with a separate battery, or assembled with the battery inside and a clear plastic tab between the battery and PCB to keep it turned off. To turn it on, you need to:
- Pull the silicone case off the top,
- Tip the PCB out
- If a battery is installed, push it out from the back with a blunt object and make sure the clear plastic tab is removed
- Push the battery back in, with the
+side of the battery (with the writing on) facing away from the Puck.js PCB:
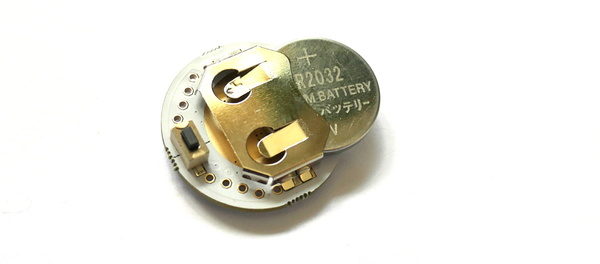
- As the battery is inserted the red LED should flash once, very briefly.
- If the green LED lights or red stays lit, it is because you have accidentally pressed the button down while inserting the battery. Remove the battery and try again, making sure the button next to the battery connector isn't pressed.
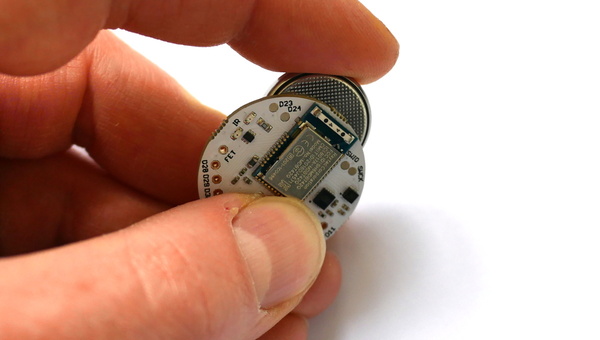
- Reassemble (note that the battery should be facing the black plastic case, and the button (next to the battery) should be positioned as far away from the 'step' in the case as possible:
Note: Do not re-fit the PCB upside-down or force it into the case. If positioned correctly it should slide in. Forcing the PCB or fitting it upside-down could damage the aerial which will stop Puck.js's Bluetooth from working correctly.
Resetting Puck.js
Occasionally you may want to reset Puck.js. To do this:
- Take the PCB out of the silicone case
- Place your finger nail between the Battery and the PCB, near the
Puck.js 1.xtext - Gently pull the battery away from the PCB for 1 second and release
- The red LED should then flash, indicating that Puck.js had rebooted.
If you are not able to do that, you can always remove the battery by pushing it out of the holder from behind with matchstick or biro. When you re-insert it, Puck.js will have reset.
Hard Reset
Perform the steps for a Reset (see above) but keep the button held for around 10 seconds.
The green LED should light, followed by all 3 LEDs, then the red LED will blink 5 times.
Release the button at least 1 second after the blinking has stopped - this will clear out any previously saved code and bonding data that could have caused you problems.
Note: If you release the button when all 3 LEDs are on then a self-test will be performed. The green LED will blink on success, or red on failure. Saved code will not be loaded from flash, but will not be erased from flash either - a subsequent reset will start Espruino up loading the saved code as normal.
Note: The initial Puck.js v2 ships with 2v05 firmware, and the self-test may report that IR LEDs are disconnected or the Blue LED voltage is wrong. This is not the case, and later firmwares have updated self test code.
Tutorials
First, it's best to check out the Getting Started Guide
Tutorials using Puck.js:
 DIY Smart Meter
 BTHome and Home Assistant Setup
 BTHome Door Sensor for Home Assistant
 Water Level Monitor
 Puck.js Vibration Sensor
 Infrared 'Pronto Hex' decoder
") Advanced Debug (SWD)
Advanced Debug (SWD)
") Quick Start (Bluetooth LE)
Quick Start (Bluetooth LE)
 nRF52 Low Level Interface Library
 Bluetooth LE Printers
 Puck.js Duplo Siren
 BLE Advertising with Node.js/Python/C#/Android
 Web Bluetooth Dashboards
 Puck.js to GCP BigQuery & Data Studio
 Stream from Puck.js to AWS IOT Core & SNS Email
 Pixl.js Wireless Temperature Display
") Bluetooth LE UARTs (NUS)
Bluetooth LE UARTs (NUS)
 Turning an Espruino Puck.js Into a Universal Presentation Clicker
 Bluetooth LE HID Keyboards
 Data Collection with Espruino
 Bluetooth LE Security and Access Control
 Bluetooth LE MIDI
 Espruino Web IDE
 Puck.js Rotary Encoder
 Bookmarklets with Web Bluetooth
 Web Bluetooth on Linux
 Web NFC, and writing to NFC tags
 Using Web Bluetooth with Espruino
 Puckmote - Universal Remote Control
 IoT for Kitchen Gardens
 Bluetooth LE and If This Then That
 Puck.js FET
 Talos, Keeping You Safe During Your Commute
 UART.js Library
") Quick Start (Writing Code)
Quick Start (Writing Code)
 Eddystone Beacons
 Puck.js Control from Android using DroidScript
 Ikea Eneby Speaker Controller
 Bluetooth LE and Node-RED with MQTT
 Bluetooth Music Controller
 Controlling Bluetooth Lights with Puck.js
 Bluetooth LE HTTP Proxies
 Exercise Machine controlled Video
 BLE Communications
") About Bluetooth LE (BLE)
About Bluetooth LE (BLE)
 Puck.js with SMS control
 Web IDE on a Raspberry Pi
 Temperature Controlled Night Light with Puck.js
 Infrared Record and Playback with Puck.js
 Puck.js Bluetooth with the Graphical Editor
 Door Controlled Light with Puck.js
 Controlling Other BLE Espruino Devices
 Pixl.js Simple Logger
 nRF52 Accurate Stepper Motor Driver
Tutorials using Bluetooth LE:
 Battery Monitor
 BTHome Library
 Bluetooth Characteristic Notifications
 LEGO WeDo 2.0
") LEGO Power Functions Clone Remote Control (Mould King M-0006 / Kaiyu / Bandra / AKOGD / MayD / etc)
LEGO Power Functions Clone Remote Control (Mould King M-0006 / Kaiyu / Bandra / AKOGD / MayD / etc)
 Pixl.js Bluetooth to Ethernet MQTT Bridge
 Bluetooth LE Emoji Advertising
 Tilt Hydrometer Repeater
 Automatic Data Download
 Bluetooth Time Setter
 Pixl.js SMS Remote Monitoring
 Pixl.js Multiplayer Pong Game
BLE Characteristic Scan
LED BLE Library
Bluefruit LE app interface
Pixl.js Multiplayer Pong Game
BLE Characteristic Scan
LED BLE Library
Bluefruit LE app interface
Tutorials using Bluetooth LE and functionality that may not be part of Puck.js:
 Interfacing to a PC
 Controlling Espruino from Tensorflow on the Desktop
 Bangle.js Data Streaming
 Time Machine Retro-Inspired Smartwatch
 Bluetooth Energy Usage Monitor
 Electric Skateboard Controller
 Wooden Bluetooth Remote for Lego Duplo Train
 Pixl.js Wireless Weather Station
 Freezer Alarm
Pinout
Hover the mouse over a pin function for more information. Clicking in a function will tell you how to use it in Espruino.
- Purple boxes show pins that are used for other functionality on the board. You should avoid using these unless you know that the marked device is not used.
- ! boxes contain extra information about the pin. Hover your mouse over them to see it.
- 3.3v boxes mark pins that are not 5v tolerant (they only take inputs from 0 - 3.3v, not 0 - 5v).
- GND is ground (0v).
- ADC is an Analog to Digital Converter (for reading analog voltages)
- USART is a 2 wire peripheral for Serial Data.
Puck.js 2
Pins not on connectors
Puck.js 1
Puck.js Lite
Note: Puck.js has one available I2C, SPI and USART (and infinite software SPI and I2C). Unlike STM32-based Espruino boards, these peripherals can be used on any pin.
Information
- There's an API reference here
- Circuit Diagram (v1)
- Circuit Diagram (v2)
- Board Layout (v1)
- Eagle CAD files (v1)
- 3D Case design files
- nRF52832 Datasheet
- MDBT42 Datasheet
Certifications:
- Puck.js 1/2 CE certification
- Puck.js 1/2 radio module has certifications for FCC (USA), CE(EU), TELEC (Japan), SRRC (China), IC (Canada), NCC (Taiwan) and KC (South Korea)
- Puck.js Lite CE certification and RoHS
- Puck.js Lite FCC certification
On-board LEDs, Button and GPIO
Puck.js contains LEDs and a button that can be accessed in the same way as other Espruino devices.
LEDs
- You can use
digitalWrite(LED1,1)to turn the first (red) LED on, anddigitalWrite(LED1,0)to turn it off. You can also useLED2for green andLED3for blue, and for convenienceLEDis defined (which is the same asLED1). - You can also use
LED1.write(1)andLED1.write(0)to get the same effect - As well as
LED1.set()andLED1.reset()to get the same effect - Finally, you can control all 3 LEDs at once using a binary number if you want
to with
digitalWrite([LED3,LED2,LED1], 7)
Button
- You can access the button's state with
digitalRead(BTN)orBTN.read()(the two commands are identical).BTN1is also defined, and is the same asBTN. - Polling to get the button state wastes power, so it's better to use
setWatchto call a function whenever the button changes state:
setWatch(function() {
  console.log("Pressed");
}, BTN, {edge:"rising", debounce:50, repeat:true});
GPIO pins
GPIO pins are numbered D0 to D31. Their numbers are usually written on the PCB.
You can use the same digitalWrite/digitalRead commands with these that you
do with the buttons, but you can also use PWM, I2C, SPI and Analog.
On-board peripherals
Puck.js's on-board peripherals are exposed by special-purpose functions
Magnetometer
You can use Puck.mag() to return one magnetometer
reading (with x, y, and z axes).
However you can also leave the magnetometer on permanently and use it to
wake Puck.js up whenever it gets a reading. See Puck.magOn()
Puck.magOn();
Puck.on('mag', function(xyz) {
  console.log(xyz);
});
// Turn events off with Puck.magOff();
If you have issues using the magnetometer, please check your battery percentage
with E.getBattery() to ensure that it has over 30% charge remaining.
When the battery is almost empty the magnetometer can stop working correctly.
NOTE: If you have a Puck.js v2 with the original firmware then magnetometer
power usage will be higher than normal (~350uA vs 40uA). To fix this add
require("puckjsv2-2v05-fix") to the beginning of your program.
Field detection
You can use the puckjsv2-mag-level (About Modules) module to configure the Puck.js magnetometer for ultra low power mode (40uA on Puck.js v2.0) while acting like a reed switch (detecting when field strength is high or low).
require("puckjsv2-mag-level").on();
Puck.on('field',function(m) {
  digitalPulse(m.state ? LED1 : LED2, 1, 100);
});
// turn off with require("puckjsv2-mag-level").off();
Note: The low power mode is opnly available on Puck.js v2.0. On Puck.js v1 and v2.1 the same functionality is implemented, but in software. The actual difference in power usage is relatively small.
Note: older versions of this library created a Puck.on('mag'
event, but while it's still sent on Puck.js v2.0 for compatibility,
we'd recommend using the new Puck.on('field' event.
puckjsv2-mag-level.js
/* Configure magnetometer in low power mode. When the field
strength is greater than the supplied threshold the Puck.on('mag')
event is fired with:

{
  x,y,z, // int: field strength
  state, // bool: is field strength greater than thresh in any axis?
  xp,yp,zp // bool: is positive field greater than the threshold
  xn,yn,zn // bool: is negative field greater than the threshold
}

Can be called with options, which contains:

options = {
  thresh : int // (default 0x2000) threshold for field strength events
  x : // (default true) trigger on X axis
  y : // (default true) trigger on Y axis
  z : // (default true) trigger on Z axis
}

NOTE: On v2.0 you can configure the hardware to watch for
a magnetic field. On other versions you have to do it in software
(which this module does)
*/
exports.on = function (options) { ... }

// Turn magnetometer off
exports.off = function () { ... }
Direct configuration
For more advanced usage you can also use Puck.magWr(reg,data)
and Puck.magRd(reg) to configure the accelerometer
chip exactly as required (using the datasheet)..
Accelerometer/Gyro
Puck.js v2.0 / v2.1 only Puck.js v2 has an accelerometer and Gyro (the LSM6DS3TR-C)
You can use Puck.accel() to return one accelerometer/gyro
reading, for example:
>Puck.accel()
={
  "acc": { "x": 253, "y": -663, "z": 16249 },
  "gyro": { "x": 551, "y": 2604, "z": 4265 }
 }
However you can also leave the accelerometer on permanently and use it to
wake Puck.js up whenever it gets a reading. See Puck.accelOn()
Puck.accelOn(); // default is 12.5Hz, with gyro
// or Puck.accelOn(1.6); for 1.6Hz low power, without gyro
Puck.on('accel', function(a) {
  console.log(a);
});
// Turn events off with Puck.accelOff();
NOTE: If you have a Puck.js v2 with the original firmware then accelerometer
power usage will be higher than normal for low data rates (~800uA vs 40uA). To fix this add
require("puckjsv2-2v05-fix") to the beginning of your program.
Movement detection
Puck.js v2 / v2.1 only You can use the puckjsv2-accel-movement (About Modules) module to configure the Puck.js accelerometer for ultra low power mode (40uA) while detecting movement:
require("puckjsv2-accel-movement").on();
var idleTimeout;
Puck.on('accel',function(a) {
  LED.set();
  if (idleTimeout) clearTimeout(idleTimeout);
  else print("Motion", a);
  idleTimeout = setTimeout(function() {
    idleTimeout = undefined;
    LED.reset();
  },500);
});
// turn off with require("puckjsv2-accel-movement").off();
puckjsv2-accel-movement.js
/* Configure acclerometer to listen for movement. When configured,
power usage is around 40uA. Movement events fire the `Puck.accel`
event.

options = {
  duration : int (0..15, default 2) how long must the movement go on for before triggering
  threshold : int (0..63, default 2) how much movement is required
  lowPower : bool - if true, use 0.6Hz vs 12.5Hz sample rate
               Threshold will need to be higher (10+) to work reliably
};
*/
exports.on = function (options) { ... }

// Turn accelerometer off
exports.off = function () { ... }
Significant Movement detection
Puck.js v2 / v2.1 only You can use the puckjsv2-accel-bigmovement (About Modules) module to configure the Puck.js accelerometer for ultra low power mode (40uA) while detecting when the Puck has been moved significantly for more than a few seconds.
require("puckjsv2-accel-bigmovement").on();
Puck.on('accel',function(a) {
  digitalPulse(LED1,1,500);
});
// turn off with require("puckjsv2-accel-bigmovement").off();
puckjsv2-accel-bigmovement.js
/* Configure acclerometer to listen for when the device is
moved significantly for a while. When configured,
power usage is around 50uA, and the `Puck.accel`
event is fired when movement happens.

options = { unused };
*/
exports.on = function (options) { ... }

// Turn accelerometer off
exports.off = function () { ... }
Step counting
Puck.js v2 / v2.1 only You can use the puckjsv2-accel-steps (About Modules) module to configure the Puck.js accelerometer for ultra low power mode (40uA) while detecting movement:
require("puckjsv2-accel-steps").on();
var steps = 0;
Puck.on('accel',function(a) {
  digitalPulse(LED1,1,1);
  steps++;
});
// turn off with require("puckjsv2-accel-steps").off();
puckjsv2-accel-steps.js
/* Configure acclerometer to listen for steps. When configured,
power usage is around 50uA. Step events fire the `Puck.accel`
event.

options = { unused };
*/
exports.on = function (options) { ... }

// Turn accelerometer off
exports.off = function () { ... }
Tilt detection
Puck.js v2 / v2.1 only You can use the puckjsv2-accel-tilt (About Modules) module to configure the Puck.js accelerometer for ultra low power mode (40uA) while detecting when it has been rotated by more than 35 degrees:
require("puckjsv2-accel-tilt").on();
Puck.on('accel',function(a) {
  digitalPulse(LED1,1,100);
});
// turn off with require("puckjsv2-accel-tilt").off();
puckjsv2-accel-tilt.js
/* Configure acclerometer to listen for when the device is
tilted by more than 35 degrees. When configured,
power usage is around 50uA. Tilt events fire the `Puck.accel`
event.

options = { unused };
*/
exports.on = function (options) { ... }

// Turn accelerometer off
exports.off = function () { ... }
Direct configuration
Puck.js v2 / v2.1 only For more advanced usage you can also use Puck.accelWr(reg,data)
and Puck.accelRd(reg) to configure the accelerometer
chip exactly as required (using the datasheet). ST has
an app note
on possible configurations.
IR / Infrared
To transmit an IR signal, you just need to call Puck.IR([...])
with an array of times in milliseconds. They alternate between the time the signal
should be on and off - eg. [on, off, on, off, on, etc].
For example the command to turn on a cheap IR lightbulb is:
Puck.IR([9.6,4.9,0.5,0.7,0.5,0.7,0.6,0.7,0.5,0.7,0.5,0.7,0.6,0.7,0.5,0.7,0.5,
  0.7,0.6,1.9,0.5,1.9,0.5,1.9,0.6,1.9,0.5,1.9,0.5,1.9,0.6,1.9,0.5,1.9,0.5,1.9,
  0.6,1.9,0.5,1.9,0.6,0.7,0.5,0.6,0.6,0.7,0.5,0.7,0.5,0.7,0.6,0.6,0.6,0.7,0.5,
  0.7,0.6,1.9,0.5,1.9,0.5,1.9,0.6,1.9,0.5,1.9,0.5,43.1,9.6,2.5,0.5]);
You can sometimes work this information out based on details online (for instance Pronto codes), however it's often easier to measure it by attaching an IR receiver to your Puck.js.
Puck.js's IR has a range of around 1.5 meters, so it needs to be relatively close to the device it's controlling - however range can be increased slightly by removing the silicone cover.
NFC - Near Field Communications
To set Puck.js up to redirect to a new NFC URL, just use NRF.nfcURL(...):
NRF.nfcURL("http://espruino.com");
or to turn off, call it with no arguments:
NRF.nfcURL();
Other NFC functionality is available - check out the reference for NRF.nfc*
methods and events, and see the Web NFC page for information
on transferring data via NFC.
Light sensor
To get a light value you can simply call Puck.light().
This returns an (uncalibrated) value between 0 and 1.
The Puck doesn't have a dedicated light sensor, but the LEDs are connected to
analog-capable pins (D5=red, D4=green, D3=blue). LEDs actually generate a
slight voltage when light is on them, and this can be read back to get a light value.
Puck.light() used the red LED (D5) for this.
While Puck.light() requires you to poll, it is possible to use the nRF52's
low power comparator on the LED's pin to allow the Puck to go to sleep and
wake up when there's a change in light:
// D5 (LED1) is used for sensing
// D1 is used as an output which is also watched with setWatch to detect a state change
var ll = require("NRF52LL");
analogRead(D5);
// set up D1 as an output
digitalWrite(D1,0);
// create a 'toggle' task for pin D1
var tog = ll.gpiote(7, {type:"task",pin:D1,lo2hi:1,hi2lo:1,initialState:0});
// compare D5 against vref/16  (vref:8 would be vref/2)
var comp = ll.lpcomp({pin:D5,vref:1,hyst:true});
// use a PPI to trigger the toggle event
ll.ppiEnable(0, comp.eCross, tog.tOut);
// Detect a change on D1
setWatch(function() {
  print("Light level changed");
}, D1, {repeat:true});
Bluetooth
Bluetooth is provided by the NRF object.
Bluetooth itself is quite complicated, so it's best to refer to the tutorials
above, or check the documentation on NRF.requestDevice
for an example of how to connect to another device.
Temperature
Temperature can be accessed with E.getTemperature(). It returns the temperature in degrees C.
- Puck.js v2: this uses a PCT2075TP temperature sensor
- Puck.js v1: this uses an on-die temperature sensor. It is accurate to ~1 degree C
for changes in temperature, however the absolute values can be 3-4 degrees C
different. For best accuracy, work out each Puck.js's temperature offset by calling
E.getTemperature()when it is at a known temperature.
Battery level
Battery level (based on a normal CR2032 battery) can be accessed with
E.getBattery().
You can also get the battery voltage using NRF.getBattery().
Capacitive sense
Puck.js contains a capacitive sense pin D11. To use it, simply add some wire
(preferably attached to something with a large surface area) to the D11 pin.
Then call Puck.capSense() - this will
return an integer value that rises as the capacitance attached to D11 increases.
FET
Puck.js v2 / v2.1 only On Puck.js v2 there's a pin called FET (available from JS and
marked on the Puck.js PCB). This is connected to a MOSFET (NTZD3154) that is
capable of pulling the FET down to GND with around 200mA.
FET.set()will turn the FET on (shortingFETto GND)FET.reset()will turn the FET off (leavingFETfloating)
See the Puck.js FET page for more information.
Serial Console
When power is first applied, Puck.js checks if pin D28 is at 3.3v (which will be the
case if it is connected to a Serial port's transmit line). If it is, it initialises
the on-chip UART on D28 (Puck.js RX) and D29 (Puck.js TX) and puts the Espruino
console (REPL) on it at 9600 baud.
To use it, connect to a 3.3v output USB to TTL converter as follows:
| Puck.js | USB->TTL converter |
|---|---|
GND |
GND |
D28 |
RX ( -> PC ) |
D29 |
TX ( <- PC ) |
3V |
3.3v (Optional - to run without a battery) |
You can now use the normal Espruino Web IDE, or a serial terminal application at 9600 baud.
When you connect via Bluetooth, the console will automatically move over. To
stop this, execute Serial1.setConsole(true) to force the console to stay on
Serial1.
Note: Serial1 is not enabled by default because it requires the high speed oscillator to stay on, which increases power draw a huge amount. If you connect the UART but don't power down and power on Puck.js, you won't get a serial port.
Power Consumption
Puck.js's power consumption depends a huge amount on not just how much JavaScript code you execute, but how much you transmit, how often, and at what power level.
Nordic provides a tool to work out power consumption, for advertising, but values are roughly:
- Not doing anything - 3uA
NRF.sleep();
- Not doing anything, watching the button for presses - 12uA
NRF.sleep(); setWatch(..., BTN1);
- Advertising, 375ms 0dBm (nonconnectable, nonscannable) - 22uA
NRF.setAdvertising({},{connectable:false, scannable:false});
- Advertising, 375ms 0dBm (nonconnectable, nonscannable), watching the button - 27uA
NRF.setAdvertising({},{connectable:false, scannable:false}); setWatch(..., BTN1);
- Advertising, 2000ms 0dBm (nonconnectable, nonscannable) - under 10uA
NRF.setAdvertising({},{connectable:false, scannable:false, interval:2000});
- Advertising, 375ms 0dBm (connectable) - default - 40uA
- Advertising, magnetometer reading 0.63 Hz (
Puck.magOn()) - 60uA - Advertising, magnetometer reading 10 Hz - 200uA
- Connected via BLE default - 600uA
- Connected via BLE default, inactive for 1 minute - 32uA
- Connected via BLE,
NRF.setConnectionInterval(200)- 40uA - One LED lit - 1000-2000uA
- 100% CPU usage running JavaScript - 4000uA
- All LEDs lit, 100% CPU usage running JavaScript - 10000uA
- No LEDs lit, using
NRF.findDevicesto scan for devices - 12000uA - Puck.js v2: Accelerometer on
Puck.accelOn()(12.5Hz) : 350uA - Puck.js v2: Accelerometer on
Puck.accelOn(1.6)(1.6Hz, no gyro) : 40uA - Puck.js v2: Accelerometer on, movement/tilt/step detect : 40uA
Note: The first Puck.js v2 units shipped with 2v05 firmware which wasn't as efficient with the accelerometer/magnetometer. See the magnetometer/accelerometer notes above for the minor code change required to fix this.
Puck.js sends advertising data without ever executing JavaScript. To get the best power consumption, make sure your code executes as rarely as possible.
Firmware Updates
Note: On Puck.js v2 do not install firmwares 2v04 and earlier. See 'recovery after 2v04 installation' below.
Please see the Firmware Update page for detailed instructions on Flashing.
Different Firmwares
We provide three distinct firmwares for Puck.js devices:
| Filename | Espruino | BLE | NFC | Neopixel | JIT | Graphics | HTTP/Network | Crypto | Flash Storage |
|---|---|---|---|---|---|---|---|---|---|
espruino_2vxx_puckjs.zip |
X | X | X | X | X | X | X | 40kb | |
espruino_2vxx_puckjs_minimal.zip |
X | X | X | X | 96kb | ||||
espruino_2vxx_puckjs_network.zip |
X | X | X | X | X | X | 40kb |
Puck.js come pre-installed with the first (normal) firmware, but if you don't need the extra features like Graphics
then you can install the minimal build. This removes those features and makes the saved flash memory space available to you via the
Storage module, which you can then use for (for example) data logging.
To use HTTP/Networking you need to attach something like an ESP8266 to the Puck.js as well as an
external power source, so as of 2v25 Networking features have been removed unless you use the
_network.zip firmware.
Troubleshooting
Please check out the Bluetooth Troubleshooting or General Troubleshooting pages.
Recovery after 2v04 Installation
On Puck.js v2 (v2.1 is unaffected), you should not install firmwares 2v04 and earlier. The pin D21/nRESET is used on Puck.js v2, and is pulled low by default.
Pre-2v05 firmwares that are not designed for Puck.js v2 configure D21/nRESET as a reset pin. This then forces the chip into a reset state, effectively 'bricking' your Puck.js.
In the very rare case that an old firmware was installed, you can recover your Puck.js by temporarily connecting pin D21 on the bluetooth module to the 3v pin on the Puck. You can then flash an up to date firmware via DFU, rebooting into Espruno, connecting and running the following code (which resets the reset pin configuration flag):
setTimeout(function() { NRF.restart(function(){
poke32(0x4001e504,2);while(!peek32(0x4001e400)); // enable flash erase
poke32(0x4001e514,1);while(!peek32(0x4001e400)); // erase whole uicr
poke32(0x4001e504,1);while(!peek32(0x4001e400)); // enable flash writing
poke32(0x10001014,0x78000);while(!peek32(0x4001e400)); // set bootloader address
poke32(0x10001018,0x7E000);while(!peek32(0x4001e400)); // set mbr settings
poke32(0x1000120c,0xfffffffe);while(!peek32(0x4001e400)); // NFC pins as GPIO
poke32(0x4001e504, 0);while(!peek32(0x4001e400)); // disable flash writing
}) }, 2000);NRF.disconnect();
Other Official Espruino Boards


This page is auto-generated from GitHub. If you see any mistakes or have suggestions, please let us know.